

This post contains Amazon affiliate links. As an Amazon Associate, I earn from qualifying purchases at no extra cost to you. I only recommend products I'd genuinely suggest to a friend.
Carving a pumpkin sounds fun until you’re elbow-deep in cold pumpkin guts with a slippery knife and a six-year-old who wants a turn. Painting skips all of that. No scooping, no sharp tools, and the pumpkin lasts weeks longer because you never break the skin.
The problem is that most painted pumpkin lists show you the same three things: a drippy blood pumpkin, a mummy, and a black cat. Cute, but your porch ends up looking like everyone else’s.
This list leans spooky on purpose. Some ideas are simple enough for a preschooler with a sponge, and others are the kind you paint after bedtime because you want one pumpkin that actually creeps out the neighbors. Grab a drop cloth and pick a few.
⚡ IN A HURRY?
Quick Picks Before You Paint
Short on time? These are the supplies that cover almost every idea in this post — grab them once and you’re set for the whole season.
- Acrylic Paint Pens — draw faces, stitches, and tiny details straight onto the pumpkin without a single brush stroke going wrong.
- Acrylic Paint Set — one multi-color set handles base coats, drips, and sponge work for every pumpkin on this list.
- Foam Craft Pumpkins — paint your favorite designs on fake pumpkins once and pull them out of storage every October instead of starting over.
- Glow-in-the-Dark Paint — the whole glow section below runs on this, and kids lose their minds the first time the porch light goes off.
- Dimensional Puffy Paint — raised dots and drips you can feel, which is what makes the egg sac and slime pumpkins so satisfyingly gross.
- Clear Acrylic Sealer Spray — a quick coat keeps porch pumpkins from smearing in the first rain, especially the drippy designs.
Spooky Faces With a Twist
A face is the fastest way to make a pumpkin feel alive. These four skip the standard triangle-eye grin for something a little more unsettling.
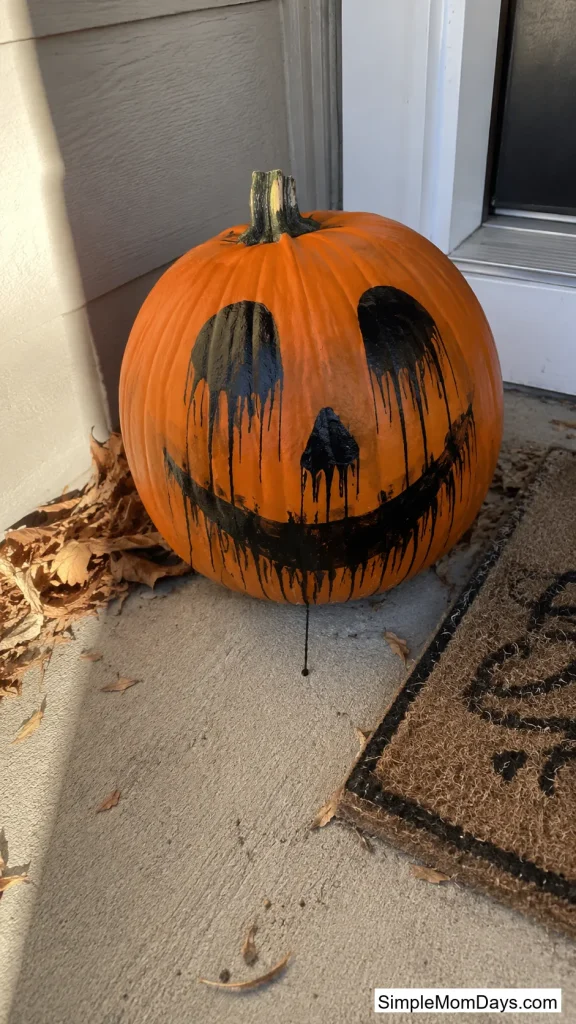
1. Melting Jack-o’-Lantern Face
Paint a classic jack-o’-lantern face in black, then drag every feature downward while the paint is still wet. The eyes droop, the grin sags, and the whole face looks like it’s sliding off the pumpkin on a hot day.
A flat brush works better than a round one here because you want streaks, not smooth lines. Pull each stroke down two or three inches and let some trails run thinner than others.
Kids find this one hilarious, adults find it creepy, and nobody on your street will have one. That’s the sweet spot.
2. Screaming Ghost Trio
Line up three mini pumpkins and paint each one white with a black open-mouth scream. Make the first mouth a small “o,” the second one wider, and the third stretched into a full howl, so the set reads left to right like a horror film getting worse.
The escalation is what sells it. One screaming pumpkin is cute. Three in a row telling a story stops people on the sidewalk.
Mini pumpkins cost a dollar or two each at most grocery stores in October, so this whole idea runs cheaper than a single large pumpkin.

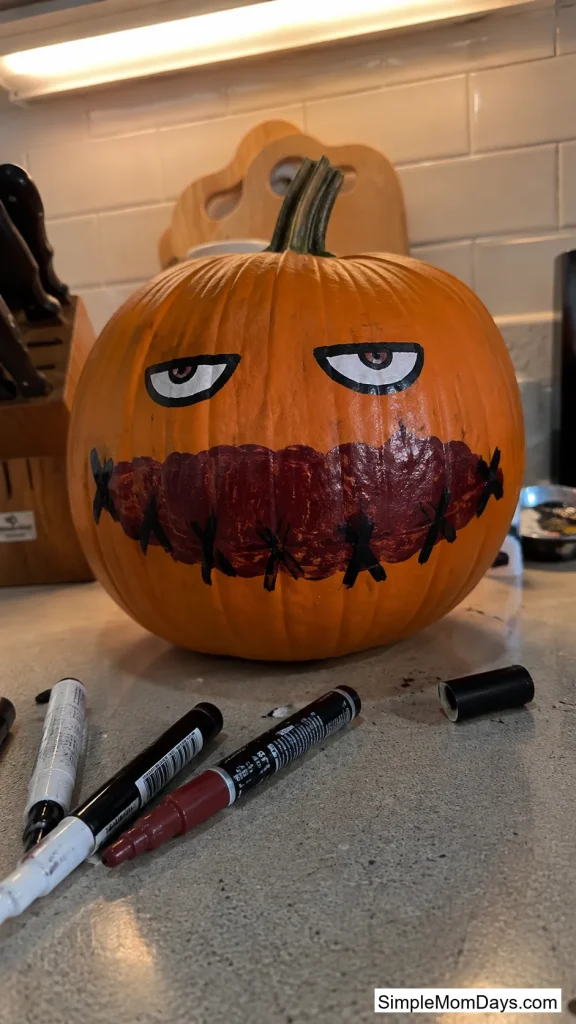
3. Stitched-Shut Grin
Paint a wide, lumpy mouth in dark red, then cross it with short black stitch marks like someone sewed it closed. Add two half-lidded eyes above it and you’ve got a pumpkin that looks like it knows something it can’t say.
Paint pens make the stitches easy. Draw the mouth line first, let it dry ten minutes, then add little X shapes across it at slightly uneven angles. Perfect spacing actually ruins the effect, so let your hand wobble.
4. Upside-Down Face
Paint a normal spooky face, but flip it: grin at the top near the stem, eyes at the bottom. The brain expects a face one way, and when it’s inverted, something feels deeply wrong before people can even name why.
This is the laziest idea on the list and one of the most effective. Same skill level as a basic jack-o’-lantern face, twice the reaction.
Set it next to a right-side-up pumpkin for contrast. The pairing makes the flipped one look intentional instead of like a painting accident.
Glow-in-the-Dark Designs
Glow paint looks like nothing special at 3 p.m. and completely changes your porch at 9. Charge these under a lamp or blacklight before dark for the strongest glow.
5. Glowing Crack Pumpkin
Base coat the pumpkin solid black, let it dry, then paint jagged cracks across it in green glow paint, like the shell is splitting open and something inside is leaking light.
Keep the cracks connected. Start one wide fracture near the stem and branch thinner lines off it, the way a dropped phone screen shatters. Random disconnected squiggles read as decoration; a connected fracture reads as something trying to get out.

6. Eyes Watching From the Dark
Black pumpkin, then pairs of glowing eyes scattered across it at different heights and sizes. Give each pair its own shape: round and startled, narrow and mean, one pair mismatched.
By daylight it’s a black pumpkin with dots. After dark it turns into a crowd of creatures staring out of the void, and it works from thirty feet away, which most painted details don’t.
This one is genuinely toddler-proof. Dots are dots, and crooked ones look better anyway.

7. Radioactive Slime Drip
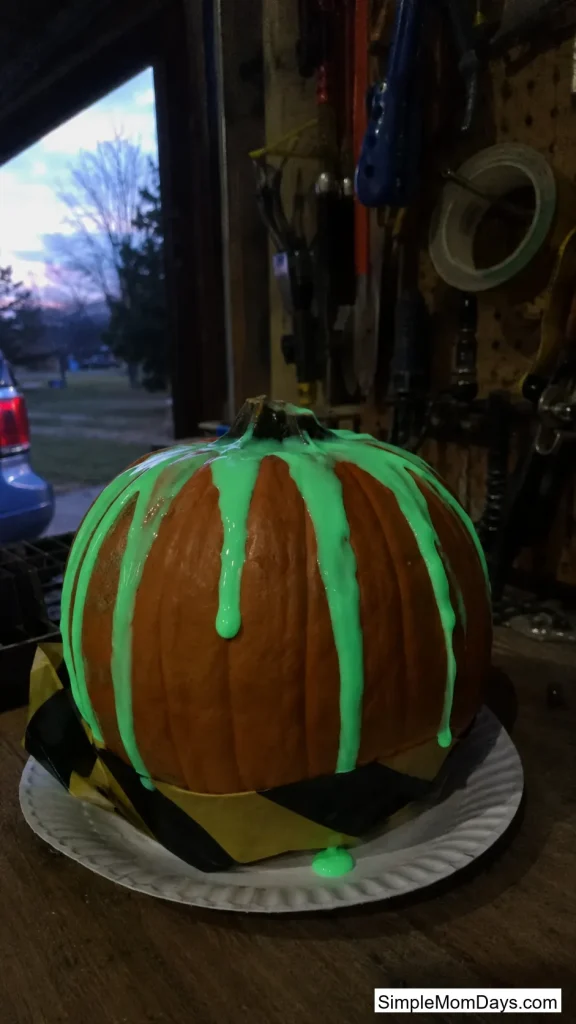
Pour green glow paint straight over the stem and let gravity do the design. The paint finds the pumpkin’s ridges and runs down in uneven channels, so every pumpkin comes out different.
Set it on a paper plate and walk away for an hour. Touching the drips mid-run smears them. If the paint is too thick to move, thin it with a few drops of water and pour again.
At night the drips glow like something out of a lab accident. Add a strip of black-and-yellow tape around the base if you want to push the hazard theme.
8. Hidden Message Pumpkin
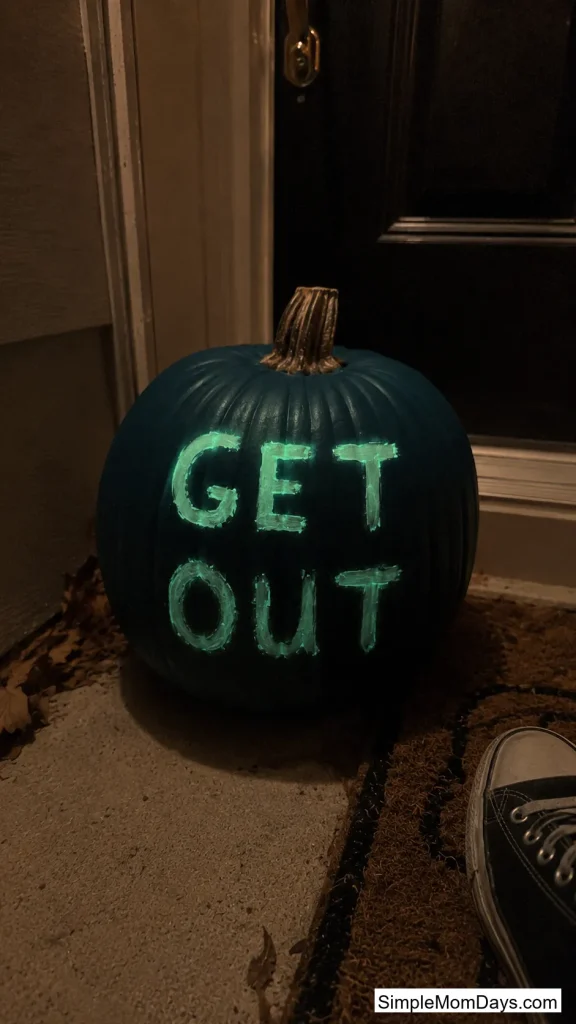
Paint the pumpkin any normal fall color, then write a message across it in clear-drying glow paint. All day it’s an ordinary decoration. After dark, “GET OUT” appears on your porch.
Test the glow paint on the back first, since some brands dry with a visible milky tint. The ones that dry nearly clear are the whole trick here.
Kids love being in on this secret. Let them pick the word, hide the pumpkin in plain sight, and wait for a trick-or-treater to notice.
Drips, Cracks, and Gross Textures
Texture is what makes people reach out and touch a pumpkin, then immediately regret it. These four are about the surface as much as the design.
9. Black Candle Pumpkin
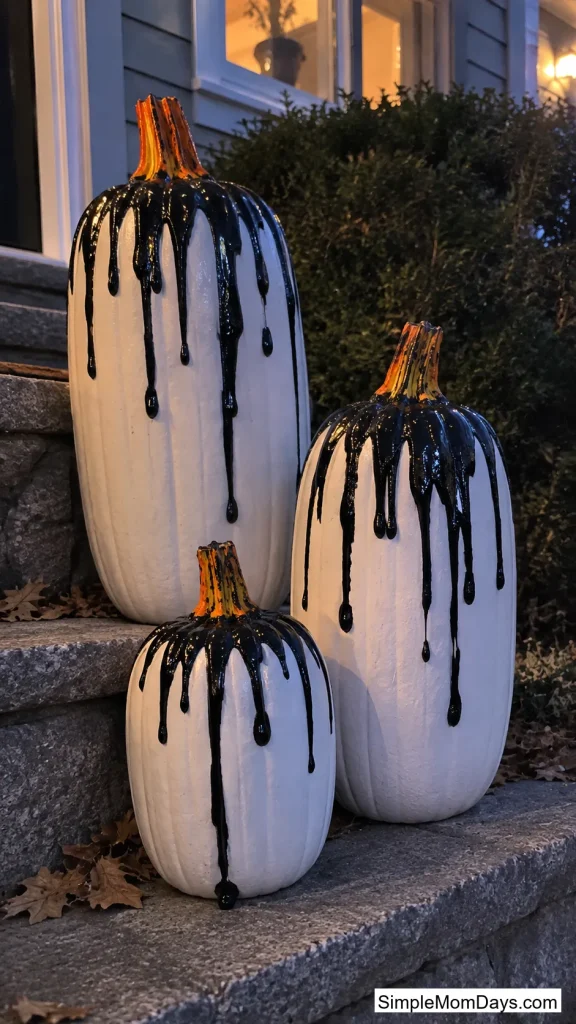
Paint a tall white pumpkin to look like a half-melted black candle: glossy black drips running from the stem, pooling in thick ridges partway down. Paint the stem itself a burnt orange-yellow so it reads as the flame.
Use the thickest black paint you have, or mix in a little glue to build up the drips. Two coats of drips, dried in between, gives you actual raised ridges instead of flat streaks.
A cluster of three in different heights looks like a gothic candelabra on your steps. This one belongs on the “after the kids are in bed” project list.
10. Tar Monster
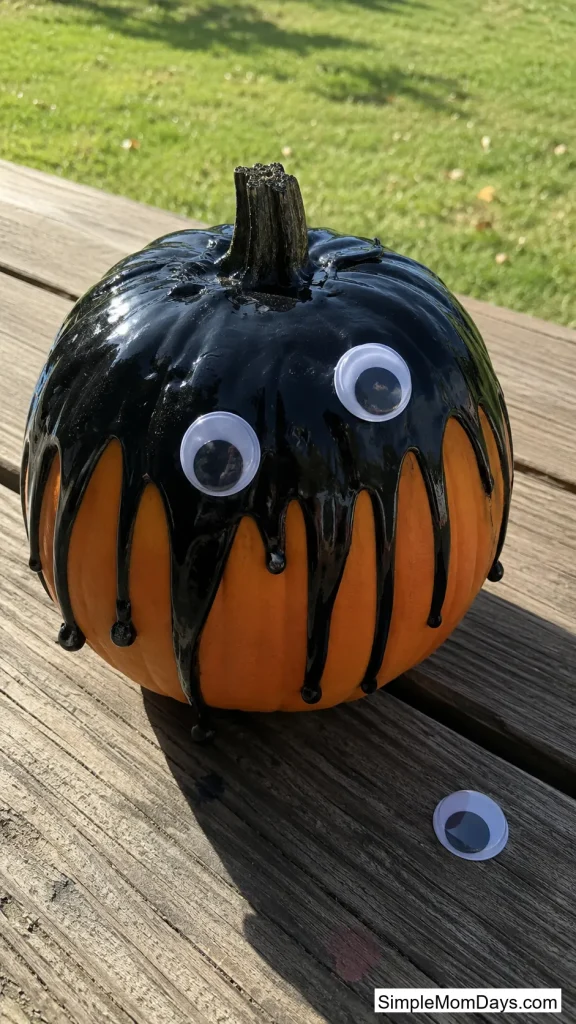
Cover the top half of the pumpkin in glossy black drips like it’s being swallowed by tar, then press two large googly eyes into the wet paint so they set into the goo, staring out.
The mix of gross and goofy makes this the pumpkin kids show their friends first. The eyes need to go on while the paint is tacky, so have them ready before you start pouring.
11. Spider Egg Sac Pumpkin
Fair warning: this one makes people shudder. Cover a white pumpkin in clusters of raised white and cream puffy paint dots, dense in some patches and sparse in others, exactly like an egg sac about to hatch.
The trick is clustering. Even spacing looks like polka dots. Tight clumps with a few strays wandering off the edge look biological, and biological is what you want.
Add one tiny black painted spider crawling out of a cluster if you want to remove all doubt about what people are looking at.

12. Cracked Relic Pumpkin
Brush crackle medium over a dark base coat, top it with a bone-white or gray layer, and watch the surface split into fine cracks as it dries. The pumpkin ends up looking like it was dug out of a tomb, not picked from a patch.
Crackle medium sounds fancy but it’s a one-step craft store product: paint it on, wait, paint over it. The cracks form on their own within the hour.
This one pairs well with the apothecary and portrait pumpkins later in the list if you’re building a whole aged, haunted-estate porch.

Creepy Characters
These pumpkins become someone, and that someone is not friendly. A little more brushwork, a lot more presence.
13. Possessed Doll Face
Paint a pale porcelain face with round pink cheeks, sweet painted lashes, and a small smile. Then ruin it: solid black eyes with no whites, and a thin crack running from the hairline down through one eye.
The sweetness is doing the heavy lifting. Anyone can paint scary; painting cute-then-wrong is what makes people say “nope” out loud.
A blush of real makeup powder works for the cheeks if you don’t want to blend paint.

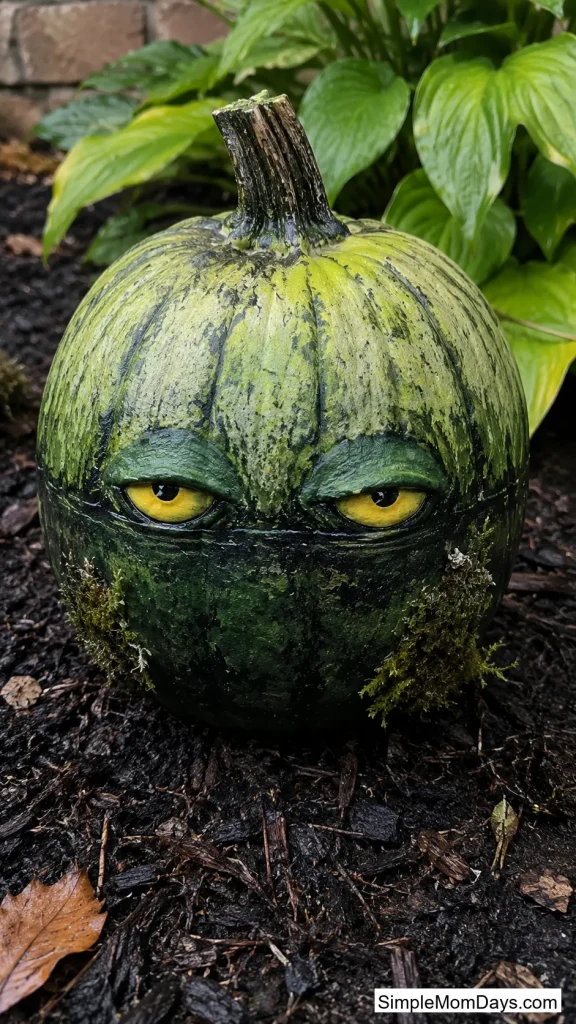
14. Swamp Creature
Layer three greens from dark at the bottom to murky yellow-green at the top, then drag darker streaks upward like algae climbing the sides. Two heavy-lidded yellow eyes peer out just above the “waterline.”
Sponge the layers instead of brushing them. Dabbing blends the greens into that wet, mossy look a brush can’t fake, and it’s faster.
Real moss from the yard, glued in a few patches, takes it from painted to genuinely swampy.
15. Plague Doctor Pumpkin
Paint the long-beaked plague doctor mask in profile: black hood, curved beak, one round glass eye. It’s a silhouette a child can paint, but the history behind it makes adults look twice.
Sketch the beak curve in pencil first. That single line carries the whole design, so it’s worth two attempts before the paint comes out.
Almost nobody paints this one, which is strange, because it’s easier than a witch and creepier than a skeleton.

16. Witch in the Moon
Paint a huge pale yellow full moon covering most of the pumpkin’s face, then a black witch silhouette flying across it, hat and broom bristles trailing. The orange pumpkin skin around the moon becomes the night sky for free.
Do the moon first and let it dry fully, or the black bleeds green into the yellow. Twenty minutes of patience saves the whole design.

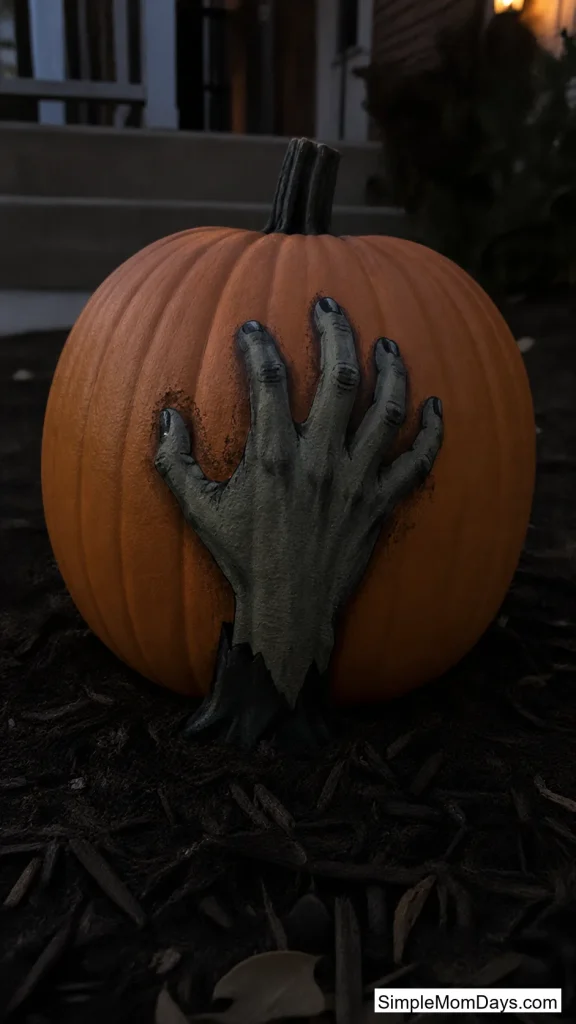
17. Zombie Hand Rising
Paint a gray-green hand reaching up the side of the pumpkin from the ground, fingers curled over the widest part like it’s climbing. Add torn sleeve edges at the base and dirt smudges around the fingers.
Trace your own hand on paper first to get the proportions, then copy it on in pencil. Hands are the hardest thing on this list to freehand, and the template removes the risk.
Position matters: set this pumpkin directly on soil or mulch, not a porch rail, so the hand looks like it came from below.
Silhouette Scenes
Black shapes on a light background forgive shaky hands, which makes silhouettes the highest-payoff style for non-artists. Each of these turns the pumpkin into a tiny haunted world.
18. Haunted House Skyline
Paint a band of black rooftops around the pumpkin’s middle: a crooked Victorian house, a leaning tower, a dead tree, a fence. Above the skyline, dot a few lit windows in yellow.
Wonky is the style here. Crooked chimneys and leaning walls look haunted; straight ones look like a suburb. This is the rare project where a ruler makes things worse.
The lit windows are the detail people notice. Two or three tiny yellow squares suggest someone, or something, is home.

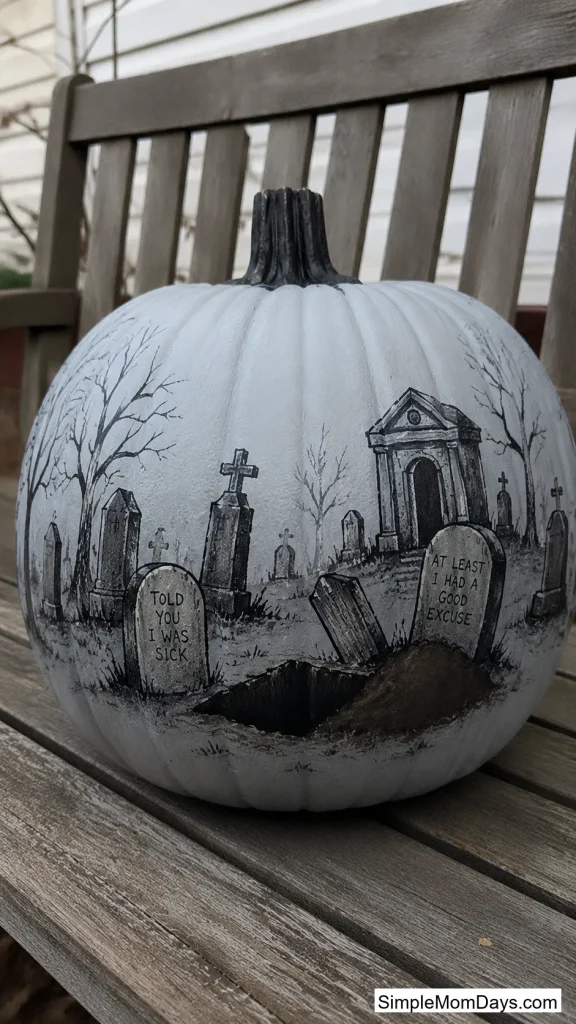
19. Graveyard Wraparound
Circle the entire pumpkin with a graveyard: tombstones of different shapes and heights, a mausoleum, one open grave with a mound of dirt beside it. There’s no front or back, so the scene continues wherever you turn it.
Vary the stones. Crosses, rounded slabs, broken stumps, one tilted at a hard angle. Rows of identical rectangles read as a fence, not a cemetery.
Write tiny epitaphs with a fine paint pen if you’re feeling ambitious. “R.I.P.” is fine, but “TOLD YOU I WAS SICK” gets photographed.
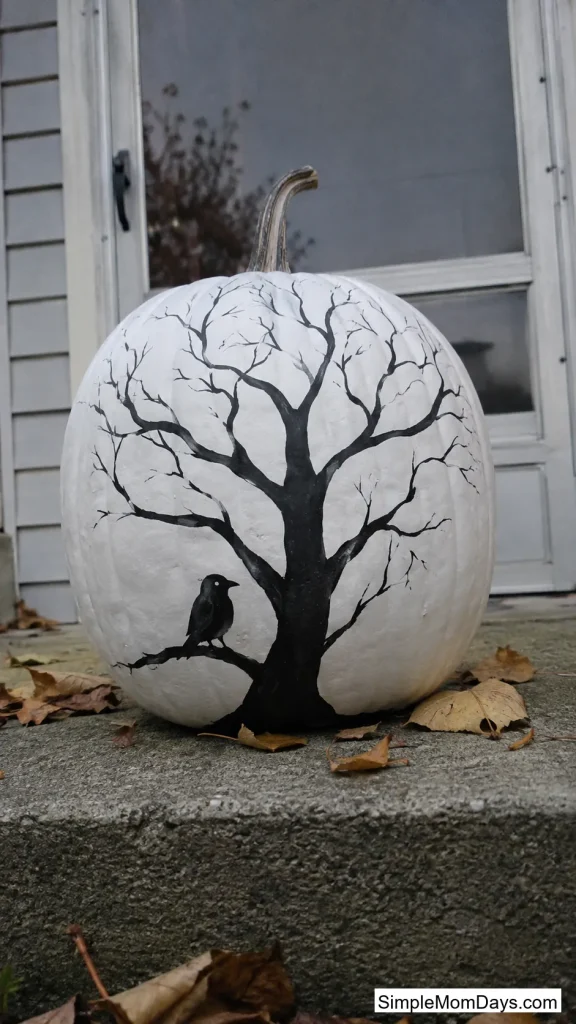
20. Dead Tree and Crow
One bare, twisted tree in black covering a whole side of the pumpkin, branches spreading toward the stem, with a single crow perched on the lowest limb. White or pale gray base coat makes the branches pop hardest.
Paint the trunk thick and split it into thinner branches as you go up, ending in twigs no wider than a pen line. Branch from existing branches and it will look like a tree no matter what.
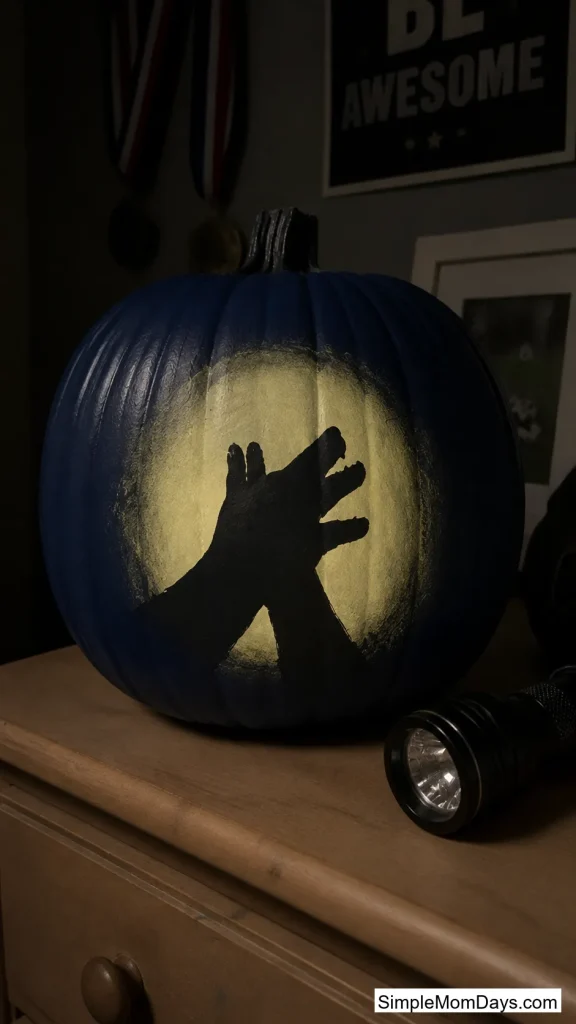
21. Shadow Puppet Wolf
Remember making hand shadow puppets on the wall? Paint one. A pale yellow circle of “flashlight glow,” and inside it, the black silhouette of two hands forming a howling wolf.
It’s nostalgic and eerie at the same time, and it’s a scene nobody expects on a pumpkin. Photograph your own hands making the wolf and copy the outline.
This one wins pumpkin contests because judges have seen a thousand bats and zero shadow puppets.
Easy Ideas for Little Hands
These four are built for kids: big motions, forgiving designs, and no step that requires a steady grip. You handle any base coat; they do the fun part.
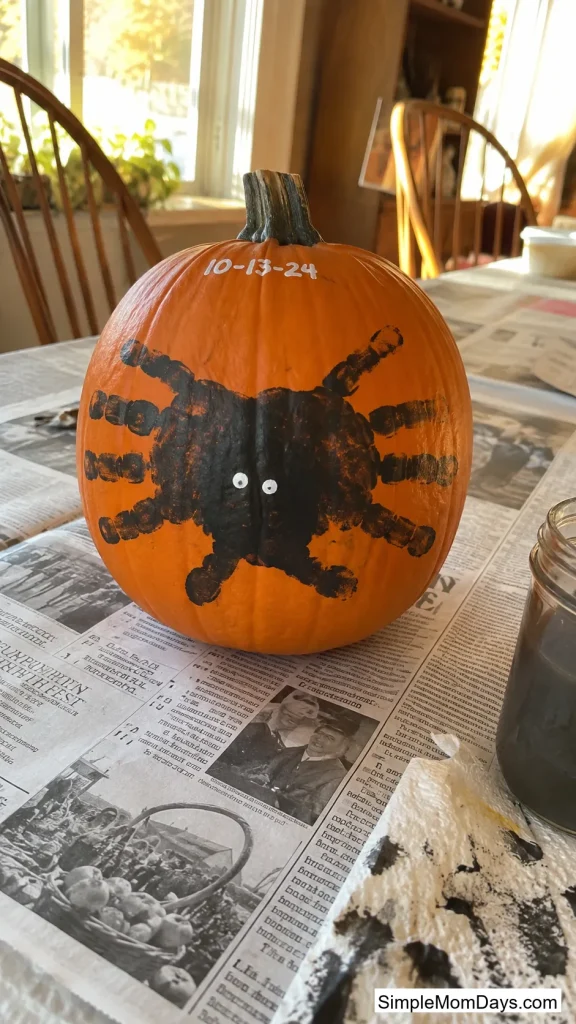
22. Handprint Spider
Paint your child’s palm and fingers black, press two overlapping handprints onto the pumpkin with fingers fanning out as legs, then add white eyes to the palm-body once it dries. Eight fingers, eight legs, one very proud kid.
Wipe the hand and re-paint between prints so the second press comes out as bold as the first. A faded print bugs you every time you walk past it.
Date the back with a paint pen. Handprint crafts sting a little in the best way when you find them years later.
23. Googly Eye Swarm
Hand over a bag of assorted googly eyes and a bottle of glue, and let your kid cover the pumpkin until it’s more eyes than pumpkin. Then paint tiny black mouths between the eyes: some smiling, some screaming.
There is no wrong placement, which is exactly why this works for the age group that gets frustrated by lines. Mixed sizes, from giant to tiny, make the swarm feel alive.

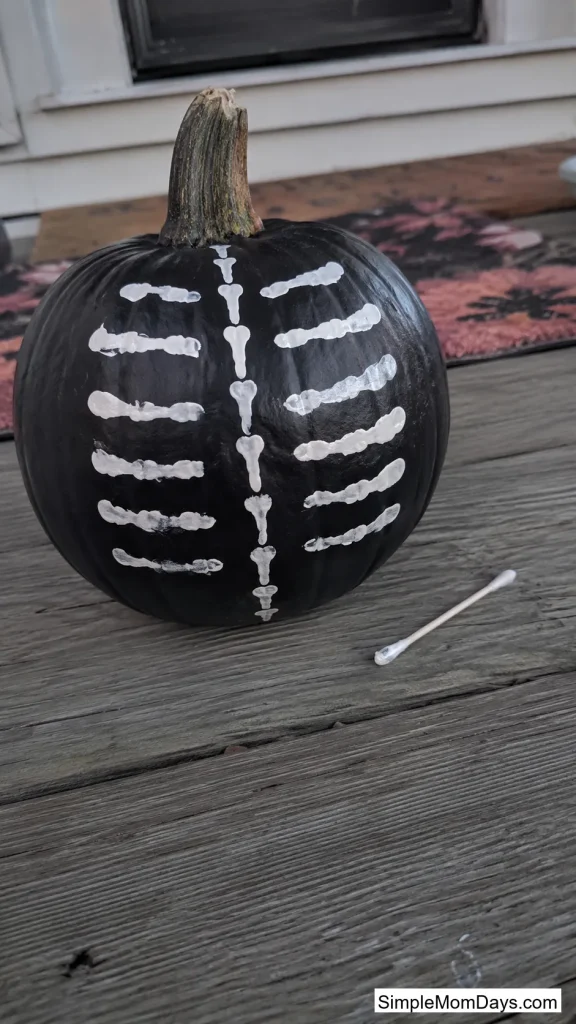
24. Cotton Swab Skeleton Ribs
Paint the pumpkin black, then have your child stamp a rib cage down the front using the side of a cotton swab dipped in white paint. A swab pressed flat prints a perfect little bone every time.
Stamp a spine line first, then ribs curving off both sides. It doesn’t need to be anatomically right; it needs to be bone-shaped and repeated, and the swab guarantees both.
The swabs double as detail brushes for dot eyes and stitches, so buy the big box.
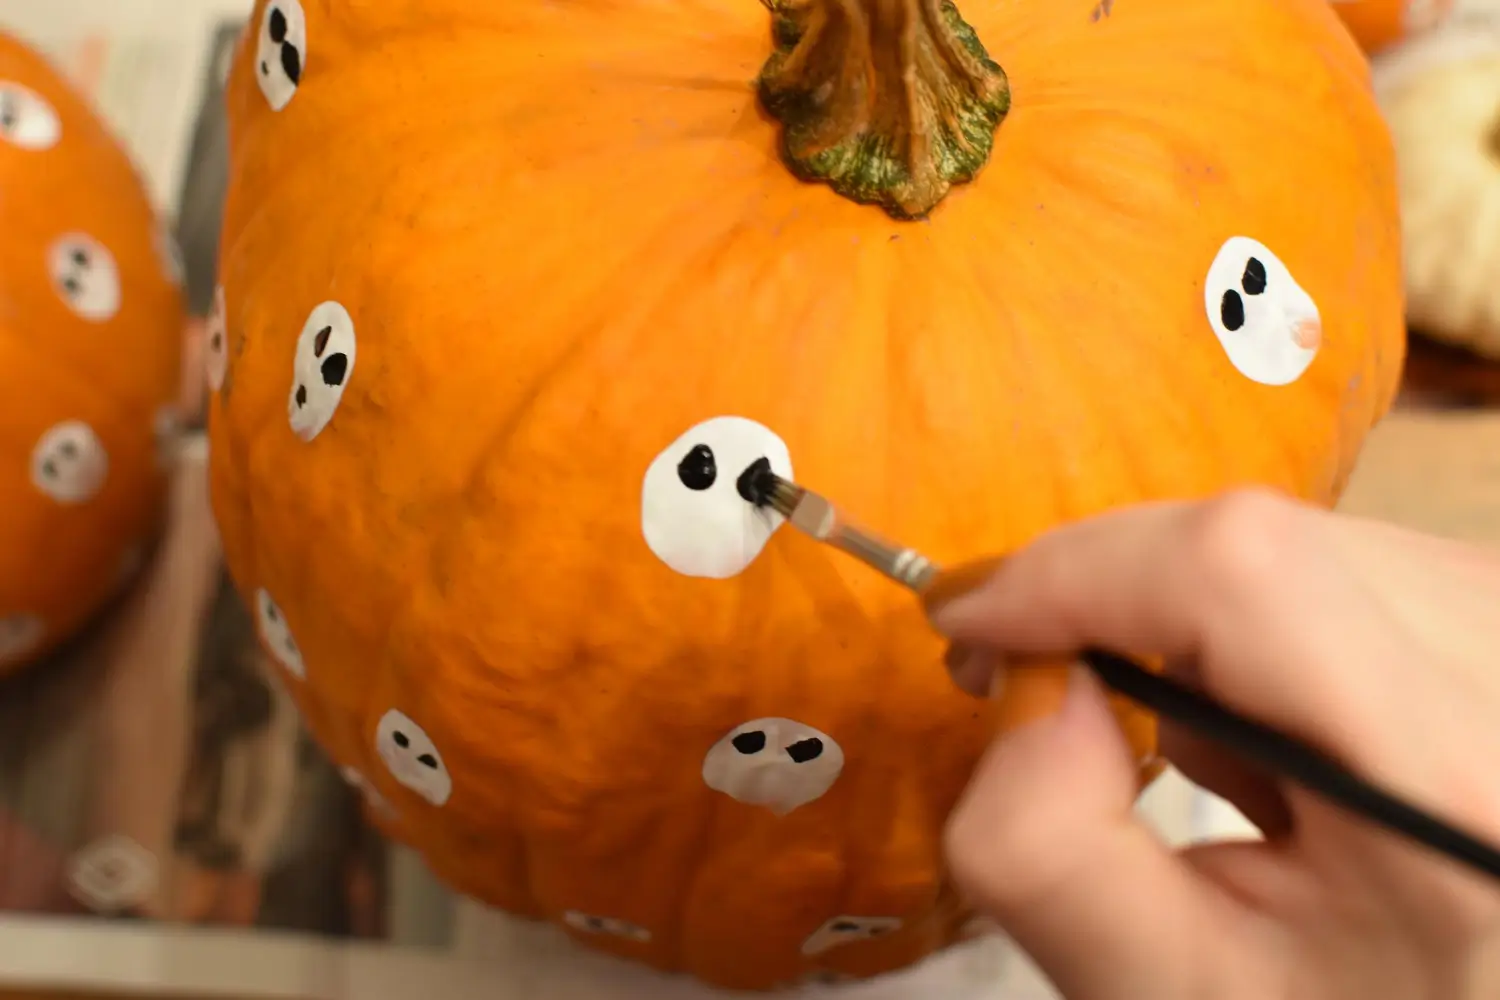
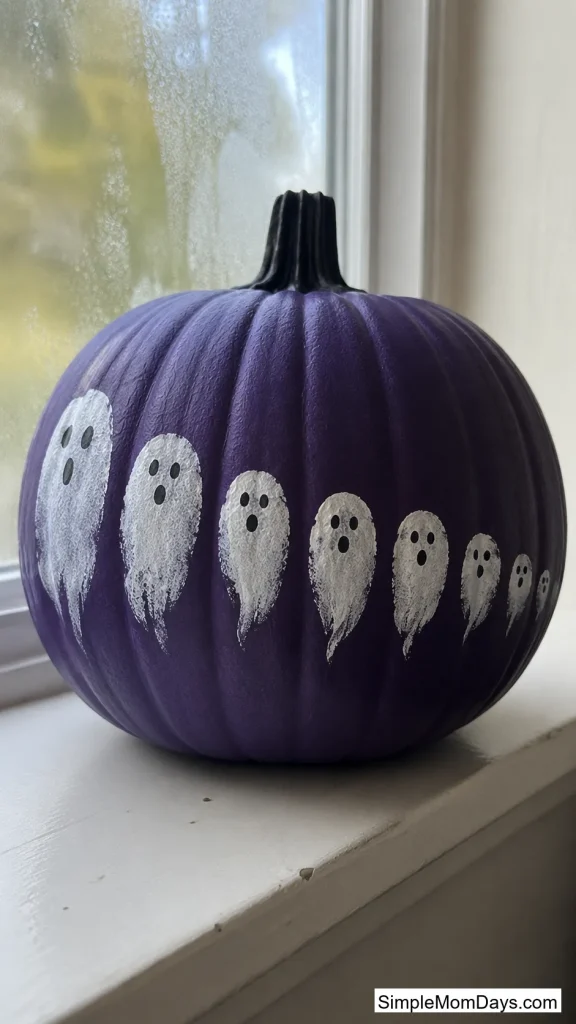
25. Fingerprint Ghost Parade
Little white fingerprints marching in a line around a dark pumpkin, each one topped with two dot eyes and a tiny “oooh” mouth once dry. Each ghost takes two seconds to print.
Fingerprints droop slightly when pressed and pulled down, which conveniently gives every ghost a wispy tail. Pull down as you lift and they all come out haunting.
For a family version, everyone adds one ghost, biggest thumb to smallest pinky, in a row.
Statement Pumpkins for the Porch
The last four are slower projects with bigger payoffs, the pumpkins people cross the street to look at. Worth doing on a fake pumpkin so they survive past November 1st.
26. Victorian Mourning Portrait
Paint an ornate gold oval frame on the front of a black pumpkin, and inside it, a faceless figure in a high-collared dress against a dim background. A portrait with no face is worse than any painted-on scream.
The frame does most of the work, and it’s just a gold oval with swirls at the top and bottom. The figure inside is a dark dress shape and a pale blank oval where a face should be.
Set it on a stack of old books or a doily. Staging turns it from a craft into a prop.

27. Static TV Pumpkin
Paint an old boxy television on the front: wood-grain frame, two dials, and a screen filled with gray-white static made by sponge-dabbing white, gray, and black together. Then add one faint dark silhouette standing in the static.
The silhouette should be barely there. Thin gray, not black, like the screen is about to resolve into someone. Too dark and it’s a picture; barely visible and it’s a haunting.
Anyone who grew up with a staticky TV feels this one immediately, and kids just think it’s a cool robot face. Everybody wins.

28. Poison Apothecary Label
Turn the pumpkin into a giant poison bottle: a vintage label painted on the front with a skull and crossbones, “POISON” in old-fashioned lettering, and a warning line underneath like “DO NOT DRINK. EVER.”
Cream and black on a deep green or amber base coat gives you that old-pharmacy look. Scuff the label edges with a dry brush of brown so it reads as aged paper.
Paint pens handle the lettering far better than brushes. Sketch the words in pencil, check the spacing, then trace.

29. Moonlit Fog Scene
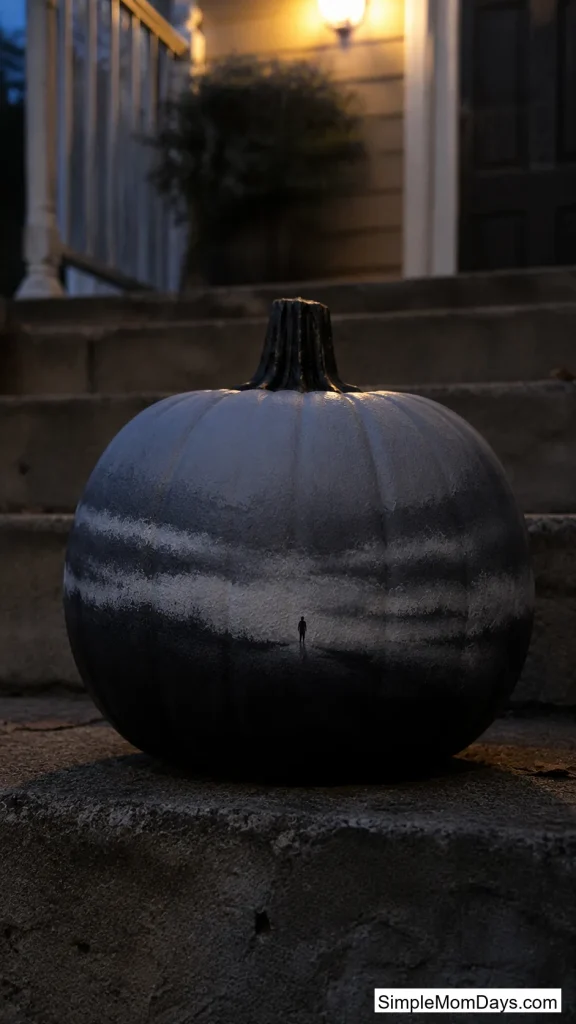
Ombre the pumpkin from black at the base to smoky gray at the top, sponge horizontal bands of pale fog across the middle, and place one tiny distant figure standing in the mist. Small, far away, and just standing there.
The figure is maybe an inch tall, and that’s the point. A huge monster is a costume; a small figure in the fog is a story your brain finishes on its own.
Blend the ombre with a barely damp sponge while both colors are wet. This is the artsiest pumpkin on the list, and also the one worth sealing and keeping.
Before You Start Painting
Wipe your pumpkin down with a damp cloth and let it dry completely before any paint touches it. The waxy film and patch of dirt on every fresh pumpkin is the number one reason paint peels off in sheets a day later.
Acrylic covers everything on this list. Base coats go on faster with a foam brush, details go on cleaner with paint pens, and anything living outside deserves a pass of clear sealer once it’s dry.
Pick two or three ideas instead of one. A lone painted pumpkin looks nice, but a cluster with a glow pumpkin, a texture pumpkin, and one creepy statement piece turns your steps into the house kids talk about. And nobody had to touch pumpkin guts to get there.