


This post contains Amazon affiliate links. As an Amazon Associate, I earn from qualifying purchases at no extra cost to you. I only recommend products I'd genuinely suggest to a friend.
Every September I walk through my living room and it suddenly looks wrong. Same couch, same shelves, but everything reads too summery once the mornings turn cold. The fix doesn’t have to be a cart full of store-bought pumpkin signs.
Most of what makes a house feel like fall is texture and warm light, and you can make both. Velvet, dried stems, dark taper candles, a little glow in a jar. A lot of these projects cost under $10 because half the materials come from your yard or the thrift store.
Here are 23 projects I’d actually make, grouped so you can pick a lane: cozy textiles, candlelight, foraged stuff, walls, the kitchen table, and the front porch.
⚡ IN A HURRY?
Quick Picks for Your Craft Basket
Short on time? These six supplies cover most of the projects below. Grab them first, then raid the yard and the thrift store for the rest.
- Hot Glue Gun Kit — it shows up in at least half of these projects, so plug it in before you start anything else.
- Fall Velvet Fabric Bundle — one bundle makes a whole bowl of chocolate and rust pumpkins, with scraps left over for napkin rings.
- Rub ‘n Buff in Antique Gold — a pea-sized smear turns dated thrift store candlesticks into the aged brass set people ask about.
- White Air-Dry Clay — no kiln needed, so the leaf trinket dishes set up overnight right on your counter.
- Cream Taper Candles — buy the plain ones in bulk and dip them whatever shade your mantel is missing this year.
- Battery Fairy Lights — the warm-white strands on thin wire disappear into branches and jars far better than any plug-in string.
Cozy Textures You Can Make in an Afternoon
Fabric does more for a fall room than any figurine ever will. These three add weight and softness without a sewing machine.
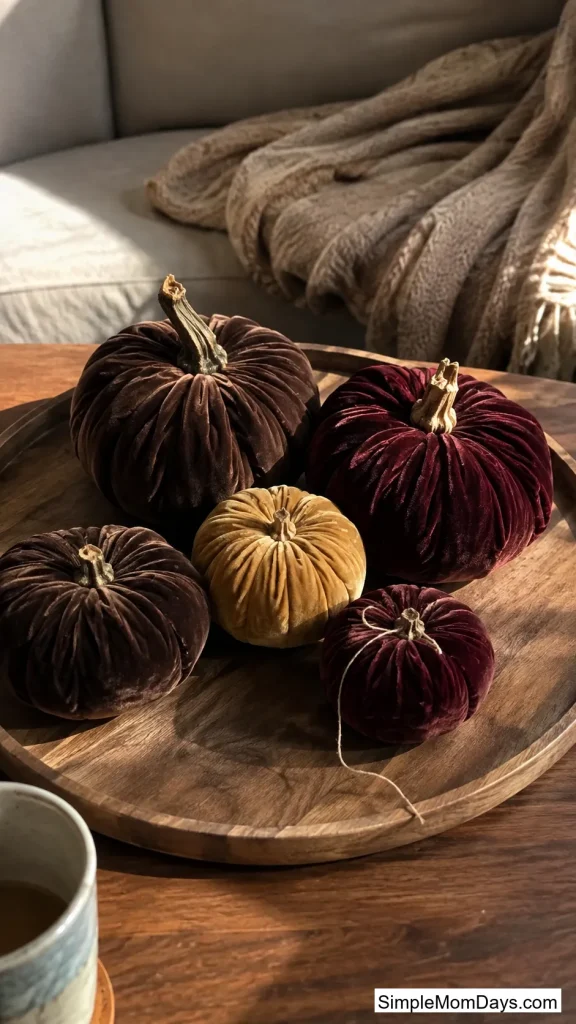
1. Chocolate Velvet Pumpkins
Fabric pumpkins have been around forever, but this year skip the orange. Chocolate brown, oxblood, and mustard velvet are everywhere in fall decor right now, and a little cluster of them on a tray looks like it came from a boutique.
Cut a circle of velvet roughly 12 inches across, run a loose running stitch around the edge, stuff with rice or fiberfill, and pull tight. If you saved stems from last year’s carving pumpkins, hot glue one into the gathered center. A real dried stem is the detail that makes people pick these up and ask where you bought them.
Make them in three sizes from one fabric bundle and you’ll have enough for the mantel, the coffee table, and a couple to give away.
2. No-Sew Flannel Pillow Covers
A men’s XL flannel shirt from the thrift store is basically a pillow cover that hasn’t been folded yet. Button it closed, turn it inside out, and cut a square around the button placket slightly bigger than your pillow insert.
Glue or fabric-tape the three raw edges, flip it right side out, and stuff the insert in through the buttons. The placket becomes the closure, so there’s no zipper and nothing to hem by hand.
Two shirts at $4 each covers a whole couch. Look for brushed cotton in rust plaid or brown buffalo check, and wash the shirts first so they smell like your house and not the donation bin.

3. A Simple Wooden Blanket Ladder
Throws piled in a basket disappear. Throws hung on a ladder become part of the room. You need two six-foot 1×3 boards, four or five thick dowels, wood glue, and a screw at each joint.
Drill holes through the side rails, glue in the dowels, and stain the whole thing something warm like early American or special walnut. The lumber runs about $20, which is a quarter of what the same ladder costs finished.
Lean it against the wall at a slight angle and drape it with your chunkiest waffle-knit throws. It also solves the where-do-the-blankets-live problem for the rest of the year.

Candlelight and Amber Glow
Evenings get dark fast in October. These projects are all about warm light, which does more for the mood of a room than any garland.
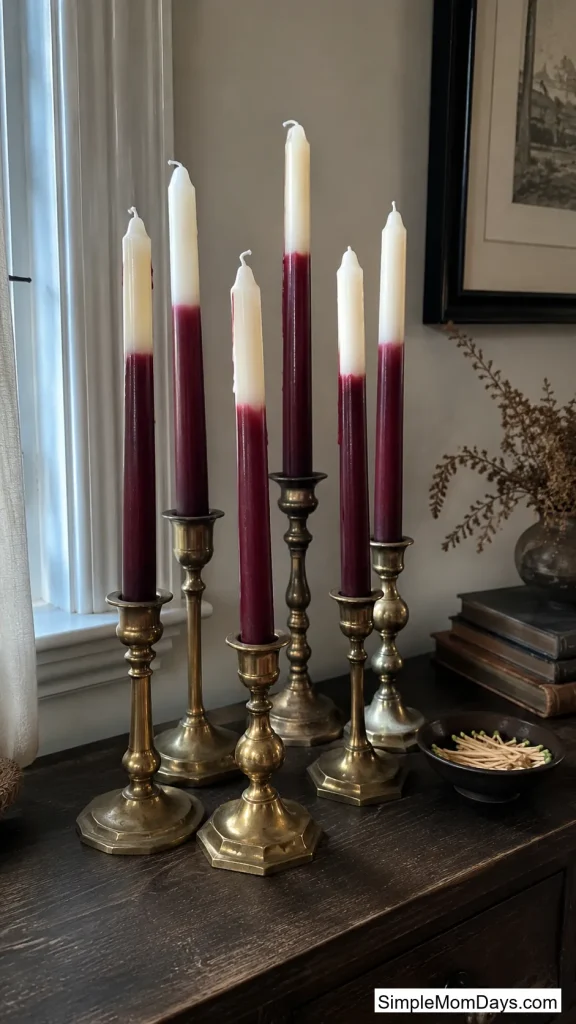
4. Antiqued Brass Thrift Store Candlesticks
Every thrift store has a shelf of sad mismatched candlesticks for a dollar or two apiece. Buy five in different heights and shapes. The mismatch is the point.
A $10 tube of Rub ‘n Buff in antique gold, rubbed on with a paper towel and buffed with a soft cloth, gives all of them the same aged-brass finish. Suddenly they read as a collection somebody gathered over years instead of a pile of castoffs.
Line them up on the mantel with your dipped tapers from the next project and you’ve got the moody, collected look that’s all over Pinterest this season for about $15 total.

5. Dip-Dyed Burgundy Taper Candles
Burgundy and plum tapers sell for $6 apiece at the fancy candle shops. Or you can melt half a block of candle wax with a chunk of red-brown dye in an old tin can set in simmering water, and dip plain cream tapers two-thirds of the way up.
Two or three quick dips builds the color, and the ombre line where the cream shows at the top is prettier than a solid-color candle anyway. Let them cure hanging over the edge of the counter with the wick taped down.
A dozen cream tapers costs about what two finished burgundy ones do, so this pays for itself the first time you burn one down.
6. Amber Glass Vases from Old Jars
That collected amber-glass look, the one that fills antique store booths every autumn, is a spray paint trick. Clean out pasta sauce jars, juice bottles, and anything glass with a nice shape.
Two light coats of translucent amber glass spray paint on the outside keeps the see-through quality while shifting everything golden brown. Vary the shapes and cluster three or five on a windowsill where the afternoon light comes through.
Tuck a single wheat stem or dried grass in each. The uneven, slightly streaky coverage you’ll inevitably get actually helps them look old, so don’t stress about a perfect finish.

7. Beeswax-Dipped Leaves
Pressed leaves crumble by November. Leaves dipped in melted beeswax keep their color and stay flexible for months, and they smell faintly like honey while you work.
Melt beeswax pellets in a thrifted pot you don’t mind sacrificing, hold each leaf by the stem, dip once, and hang it from a clothespin line for a minute to set. That’s the whole craft. Kids can do the dipping if you handle the pot.
String the finished leaves on twine for a garland, or scatter them down the middle of the table where a runner would go.

8. Twinkle-Light Branch Jar
Take the biggest glass jar or vase you own, stand a few curly willow or birch branches in it, and wind one strand of warm-white battery fairy lights up through the branches.
Hide the battery pack in the bottom under a handful of moss or mini pinecones. Set it on the console table or in a dark corner that overhead lighting never reaches, and put the lights on a timer setting so they come on at dusk by themselves.
It’s the five-minute version of expensive lighted branches, and unlike a candle, you can leave it running while you wrangle bedtime.

Foraged and From the Yard
Some of the best fall decor is free if you take a walk with clippers. These five lean on branches, wheat, and whatever your garden is winding down with.
9. A Foraged Branch Arrangement by the Door
One tall arrangement of real branches beats a dozen small decorations. Cut three or four branches with turning leaves, each four to five feet long, and stand them in a heavy crock, umbrella stand, or big pitcher near the entryway.
Cut the stems at an angle and put them in an inch of water and the leaves hold their color for a week or two. Or skip the water and let them dry in place for a crunchier, moodier version that lasts all season.
Maple and oak give you the classic reds and rusts. If your yard only offers plain branches, they still look great wound with a fairy light strand.

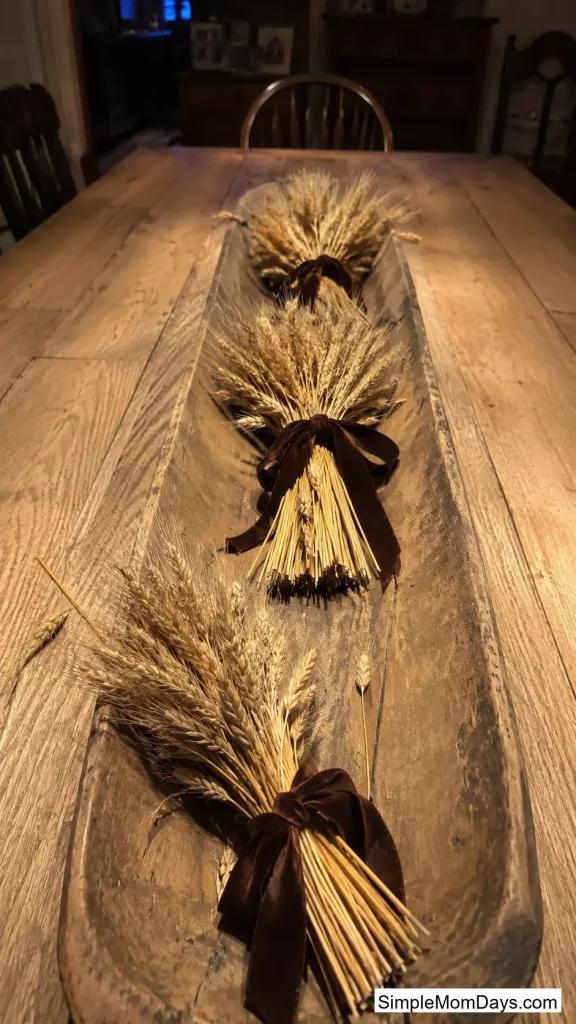
10. Wheat Bundles in a Dough Bowl
Dried wheat is one of the cheapest fall materials there is. A bundle costs a few dollars at the craft store, and it lasts for years if you store it flat.
Divide it into three or four small sheaves, tie each with chocolate or rust velvet ribbon, and lay them lengthwise in a wooden dough bowl down the center of the dining table. That’s it. No foam, no arranging skills.
When you need the table for actual dinner, the whole bowl lifts off in one move, which is more than you can say for most centerpieces.
11. Dried Hydrangeas from the Garden
If you or a generous neighbor has a hydrangea bush, late September blooms dry beautifully. The trick is timing. Wait until the petals feel papery on the plant, then cut long stems and stand them in a vase with just an inch of water.
Let the water evaporate and don’t refill it. Over two weeks the blooms dry in place, holding those dusty green, mauve, and parchment tones that fit this year’s moodier palettes perfectly.
One big cloud of them in a crock on the floor fills a corner that would otherwise need a plant you’d have to keep alive.

12. Corn Husk Flowers
The dried corn husks sold for tamales make surprisingly elegant flowers, and a big bag costs a couple of dollars. Soak the husks in warm water for ten minutes so they bend without cracking.
Cut petal shapes, layer five or six around a center, and wire them onto a floral stem, letting each layer dry curled slightly outward. Dye the soaking water with a splash of strong tea or beet juice if you want blush and tan tones instead of plain cream.
A dozen of them in one of your amber jars reads as high-end dried florals, and nobody guesses they started in the grocery store’s Mexican food aisle.

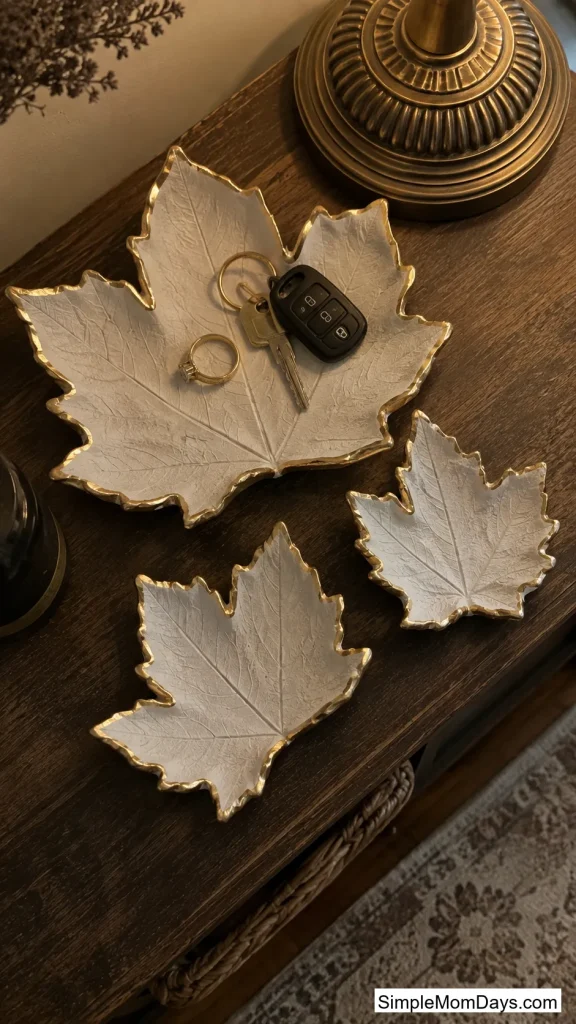
13. Clay Leaf Trinket Dishes
Roll out white air-dry clay to about a quarter inch, press a real maple or oak leaf into it firmly, and cut around the outline with a butter knife. Peel the leaf away and every vein stays printed in the clay.
Drape the cutout over an upside-down bowl so it dries with a gentle curve, and you’ve got a shallow dish in a day or two. Paint it or leave it matte white and just gild the edge with gold paint pen.
Make a few for the entry table, keys and rings included. They also wrap up nicely as teacher gifts in November, so make extras while the clay is out.
Walls, Shelves, and Doors
Vertical surfaces are where fall decorating usually stops at one wreath. These four go further without a single nail hole you’ll regret.
14. A Thrifted Basket Wall
Flat woven baskets, trivets, and round trays are piling up in every thrift store, usually for a dollar or two each. Collected on one wall in a loose cluster, they do what a gallery wall does but with texture instead of frames.
Gather seven to nine pieces in different sizes and weaves, keeping the tones in the tan-to-walnut family. Lay the arrangement out on the floor first, biggest piece slightly off-center, then hang them with small nails or command strips through the weave.
It’s warm, it’s trending in a big way this fall, and unlike seasonal wall art, you won’t feel forced to take it down in December.

15. Embroidery Hoop Mini Wreaths
A full grapevine wreath on every door gets expensive. Embroidery hoops, at about a dollar each, make lighter, more modern wreaths in ten minutes apiece.
Stain or leave the hoop raw, then wire a small cluster of dried grasses, wheat, or preserved eucalyptus onto the lower third only. The bare wood arc above the stems is what makes it look intentional. Finish with a short velvet ribbon loop for hanging.
Make three in different hoop sizes and hang them at staggered heights on one wall, or put one on every bedroom door upstairs.

16. Kraft-Paper Book Stacks
Those decorator book bundles in neutral covers sell for $25 a stack. You can make them from the sad paperbacks already on your shelf. Wrap each book in kraft paper or brown grocery bags exactly like a school textbook.
Hand-letter short titles down the spines with a fine black marker. Use cozy words or family jokes, real titles or made-up ones, nobody inspects them closely. Slightly crooked lettering looks better than perfect, so don’t sketch it in pencil first.
Stack three horizontally under a candlestick or a small pumpkin and you’ve got that styled-shelf look for the cost of a paper bag.

17. Cabinet Knob Mini Wreaths
Here’s one for the kitchen, which always gets skipped. Tiny grapevine rings, about three inches across, get a dried apple slice, a star anise pod, and a cinnamon stick wired on, then hang from kitchen cabinet knobs on short twine loops.
Dry the apple slices yourself in a 200-degree oven for a couple of hours while you’re home anyway. Six little wreaths take one apple and maybe twenty minutes of assembly.
They make the whole kitchen smell faintly of spice every time you open a cabinet, and they photograph ridiculously well if your kitchen is part of your fall tour.

The Kitchen Table
The table is where everyone actually gathers, so it earns its own section. Five projects here, from napkins to gift tags.
18. Potato-Stamp Leaf Napkins
Block printing sounds intimidating until you remember it’s the same craft you did in kindergarten with a potato. Cut a potato in half, carve a simple leaf shape into the flat side, and stamp fabric paint onto plain flour-sack napkins.
Keep the layout loose, some leaves overlapping the hem, a few off the edge. Rust and ochre paint on cream cotton looks hand-printed in the way that costs $40 for four napkins at the nice home stores.
Heat-set the paint with an iron and they’re washable. This one’s genuinely fun to do with kids, and their wonkier stamps usually turn out the most charming.

19. A Stenciled Drop-Cloth Table Runner
A canvas painter’s drop cloth from the hardware store, around $12, yields two or three table runners plus scraps. Cut a strip about 16 inches wide, pull threads along the cut edges to fray them, and wash it once so it softens.
Stencil a simple grain-sack stripe down each end in warm brown craft paint, or a single word like GATHER in blocky letters if you like a farmhouse look. Painter’s tape makes clean stripe edges with zero skill required.
The fabric only gets better with washing, so spills at Thanksgiving aren’t a crisis. Make a second one plain for everyday.

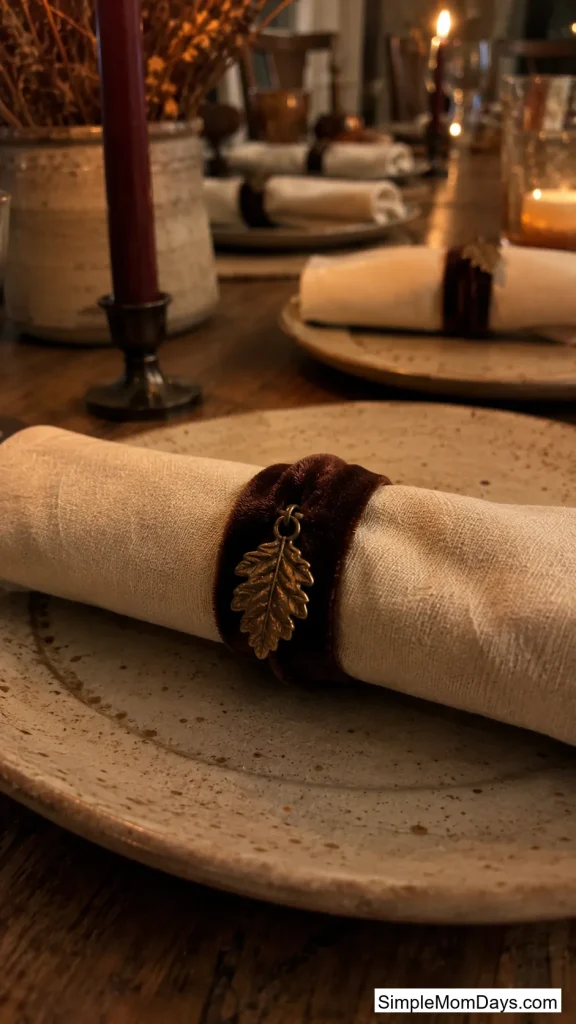
20. Velvet Ribbon Napkin Rings
Leftover velvet ribbon from the pumpkins and wheat bundles becomes napkin rings in about two minutes each. Cut seven-inch lengths, loop each around a rolled napkin, and secure the overlap with a dab of hot glue.
Hot glue a small brass leaf charm or a single acorn cap over the seam. Done. The chocolate and oxblood ribbon tones tie the table to the rest of the house without buying a matching set of anything.
Because each ring is glued to fit, roll the napkins first. Or leave the loops slightly loose and slide them off to reuse at Christmas with different charms.
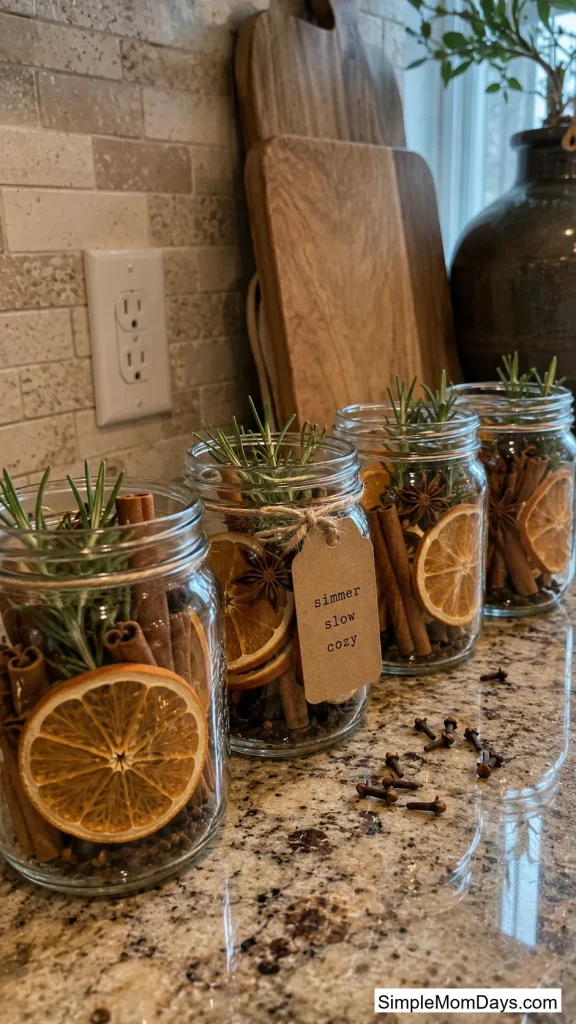
21. Simmer Pot Jars
Layer dried orange slices, cinnamon sticks, whole cloves, star anise, and a sprig of rosemary in small glass jars. Lined up on the counter, they’re decor. Dumped into a pot of simmering water on a Sunday, they make the house smell like you baked something.
Dry the orange slices in the oven at 200 degrees for two to three hours, flipping once. One batch of oranges fills four or five jars, and the spices come cheapest from the bulk bins.
Tie a tag with simmering instructions on a couple of extras. They’re the easiest hostess gift of the season, and you’ll want a few ready by mid-October.
22. Cinnamon Dough Tags
Equal parts cinnamon and applesauce, mixed into a stiff dough, rolls out and cuts like sugar cookies but dries into deep brown ornaments that smell incredible for months. Poke a hole in each before drying.
Cut leaf, acorn, and pumpkin shapes, then air-dry them for a day or two, flipping so they stay flat. They’re sturdy enough to handle but not edible, so hang them above little-kid height.
String them on twine as gift tags, hang a row from a branch, or pile them in a bowl by the door. One batch makes about two dozen, and your hands smell like cinnamon for the rest of the day.

The Front Porch
One last project for the space everyone sees first.
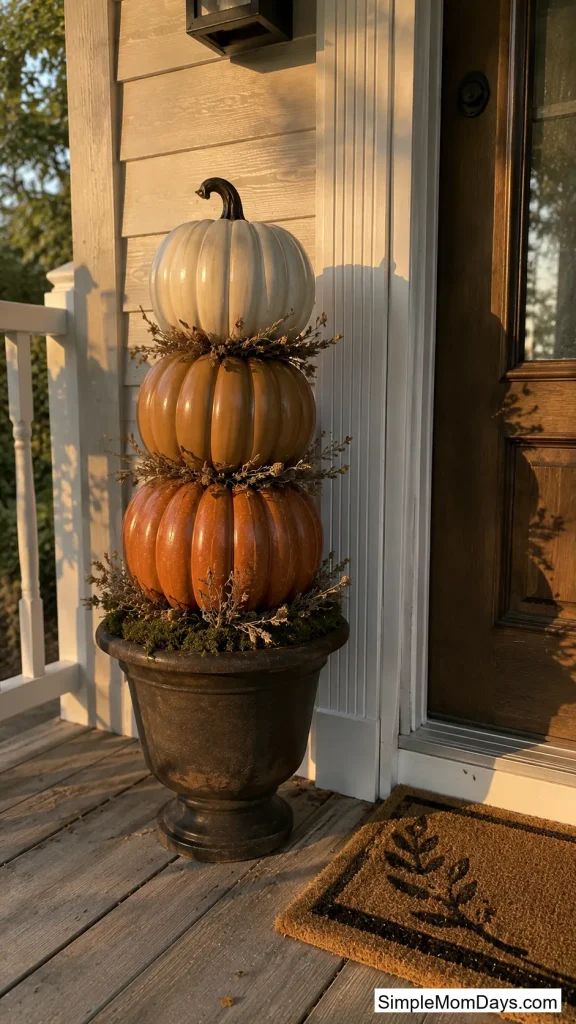
23. A Pumpkin Stack Topiary
Three faux pumpkins in graduated sizes, stacked and secured on a dowel, turn into a four-foot topiary that flanks a front door all the way through Thanksgiving. Drill or cut a hole through the center of each pumpkin, thread them onto the dowel, and stand it in a planter weighted with sand or rocks.
Cover the planter’s surface with moss and tuck a few dried stems around the base pumpkin. A mix of one white, one caramel, and one deep orange pumpkin looks more current than three matching ones.
Faux pumpkins mean it survives rain and comes back out next September. Make a pair if your porch has room, one on each side of the door.
Start With One Corner
Twenty-three projects is a menu, not a to-do list. Pick the room you sit in most, choose two or three ideas that share a color, and stop there. A mantel with dipped tapers, antiqued candlesticks, and a few velvet pumpkins does more than scattered decorations in every room.
And save the leftover ribbon and clay. Half of these supplies roll straight into Christmas crafting in a few weeks.