Every graduation party ends up with the same three tables: gifts, food, and photos. The problem isn’t the tables themselves — it’s that most of them get decorated the same way every single year. A mason jar with some ribbon. A “Congrats Grad” banner taped above the cake. Done.
None of that is wrong, exactly. It’s just tired. If you’ve got a grad this year and want the tables to feel like they belong to your kid instead of a party supply catalog, these 21 ideas cover centerpieces, dessert setups, memory tables, gift stations, and a few backdrop tricks that don’t cost much more than a trip to the craft store.
Pick five or six that fit your space and your grad’s personality rather than trying to do all 21. A few well-styled tables always beat a house full of half-finished ones.
Centerpieces That Don’t Look Like Everyone Else’s
Mason jars are everywhere for a reason, but if your grad’s friends have all had the exact same jar-and-twine centerpiece at their own parties this spring, here’s how to skip it.
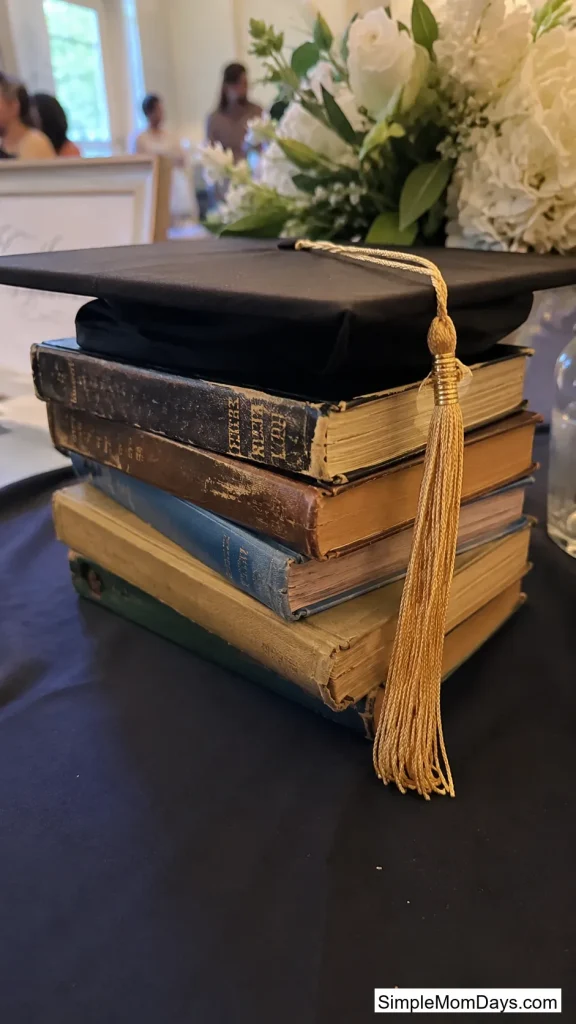
1. Stacked Book Towers with a Cap on Top
Pull a few hardcover books from around the house — old textbooks, a favorite childhood series, anything with some heft — and stack them in a short tower. Set a real or paper graduation cap flat on top, tassel hanging off the edge.
It works because it’s the one centerpiece idea that actually references what the party is celebrating without spelling it out in glitter letters. Guests notice the books before they notice it’s “decor.”
Swap in books that mean something to the grad — the first Harry Potter, a dog-eared AP Bio textbook — and it turns into a conversation piece instead of filler.
2. Repurposed Glass Bottles in Gold
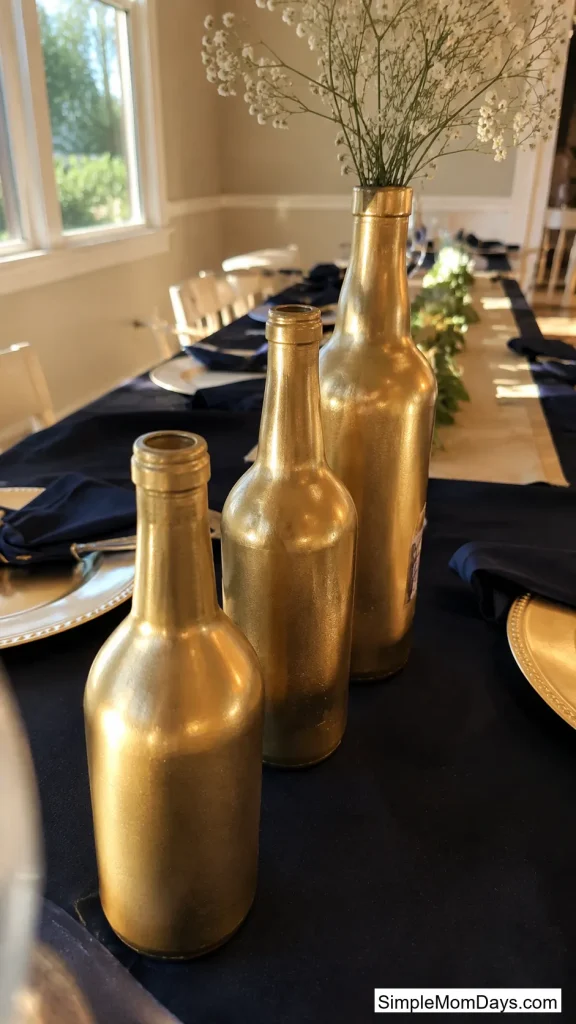
Save a handful of empty glass bottles — sparkling cider, sparkling grape juice, or plain glass vases work fine — and spray paint them gold or your grad’s school color. Group three or four at different heights down the center of the table.
The mismatched heights do more work than the paint does. A single tall bottle flanked by two short ones reads as styled; a row of identical jars reads as assembly-line.
Tuck a few stems of baby’s breath or dried wheat into the tallest bottle for texture without needing a full floral budget.
3. Terra Cotta Pot Flip Centerpieces
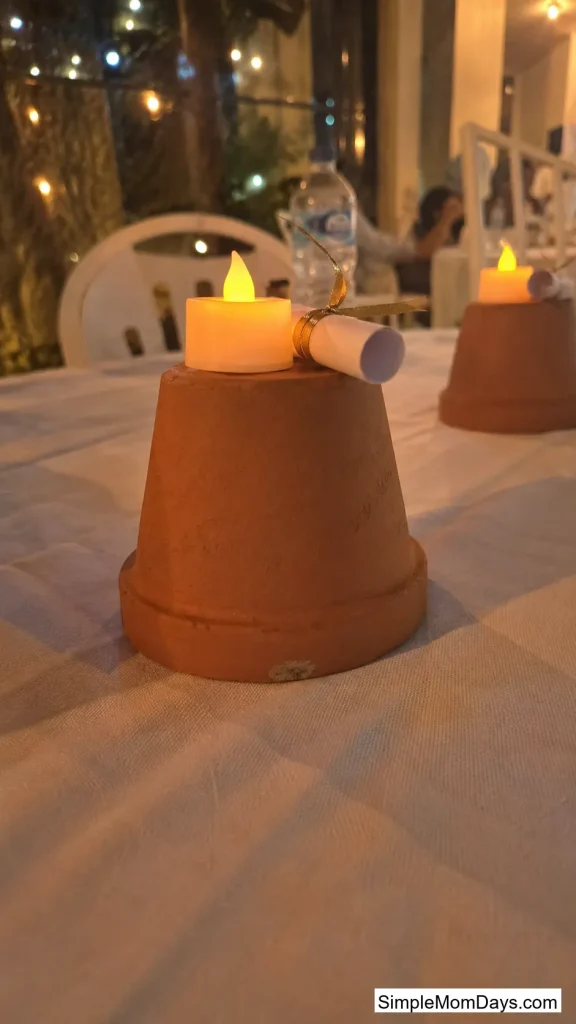
Flip a small terra cotta pot upside down and set a battery candle, a mini succulent, or a rolled-up “diploma” made from cardstock on top. Paint the pot first if you want it to match your color scheme.
This one earns its spot because it’s genuinely a different shape than everything else on a typical grad table — most centerpieces go up, this one has a wide, grounded base that photographs well from above.
At just a couple dollars per pot, it’s an easy one to repeat down a long table without the cost adding up.
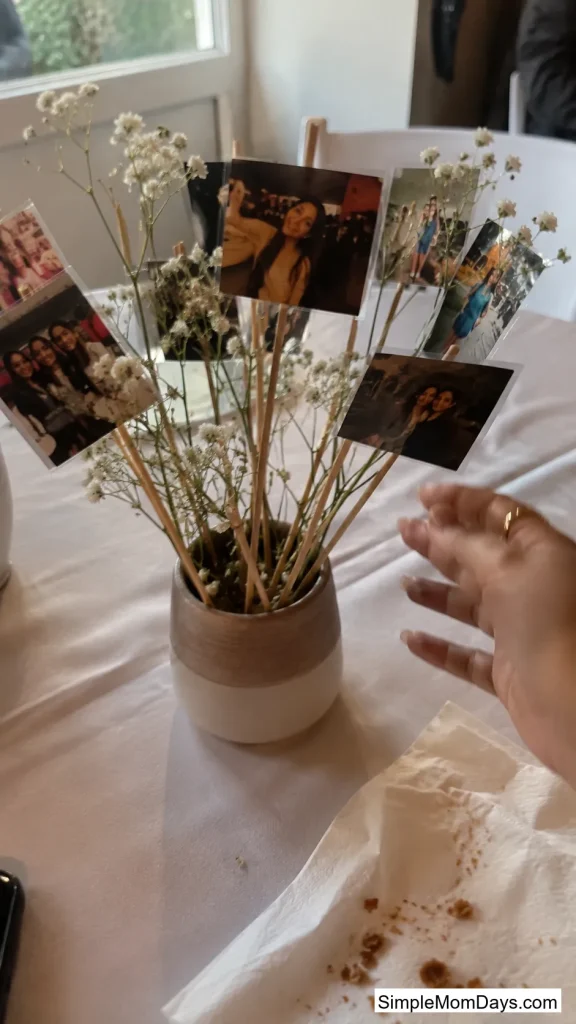
4. Skewer Photo Bouquets
Glue small printed photos of the grad — baby pictures, first day of school, prom — onto wooden skewers or thin dowels, then arrange them like a bouquet in a low vase or a flipped terra cotta pot.
Unlike a photo collage taped to a wall, this puts the grad’s whole timeline right at eye level while people are eating, which starts conversations without anyone having to walk over to a separate memory table.
Mix in a few plain floral stems between the photos so it doesn’t read as one giant grid of faces.
Dessert Table Setups Worth Photographing
The dessert table gets the most foot traffic of any table at the party, so it’s worth the extra ten minutes of styling.
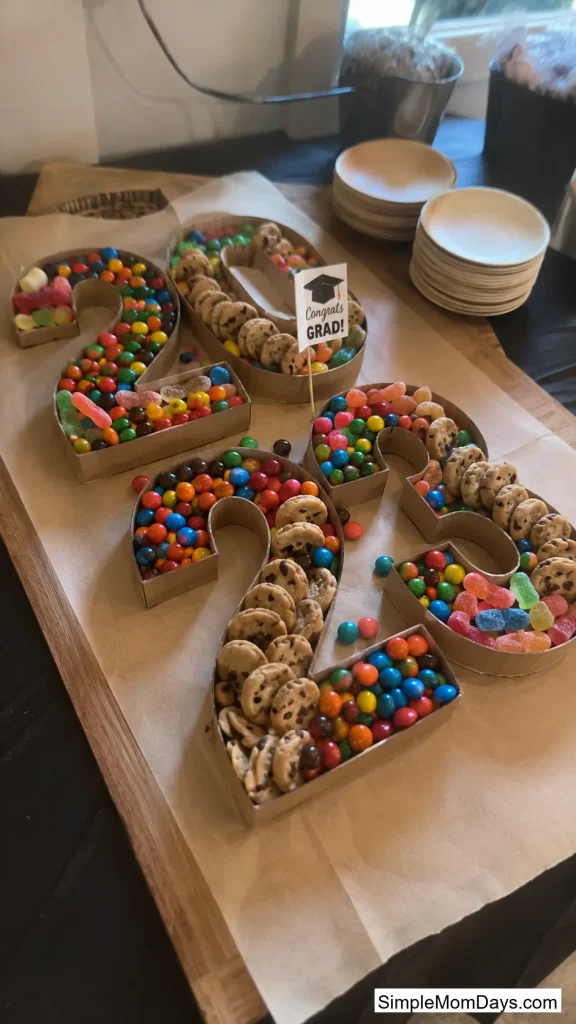
5. Number-Shaped Candy Boards
Cut the graduation year — 2026, or just the last two digits — out of foam board or thick cardboard, then fill each number’s outline with candy, mini cookies, or small treats sorted by color.
It replaces the usual flat tray with something guests can actually see from across the yard, and it turns dessert into a display piece instead of an afterthought sitting next to the cake.
Line the edges with parchment paper first so cleanup doesn’t mean scrubbing sugar out of cardboard.
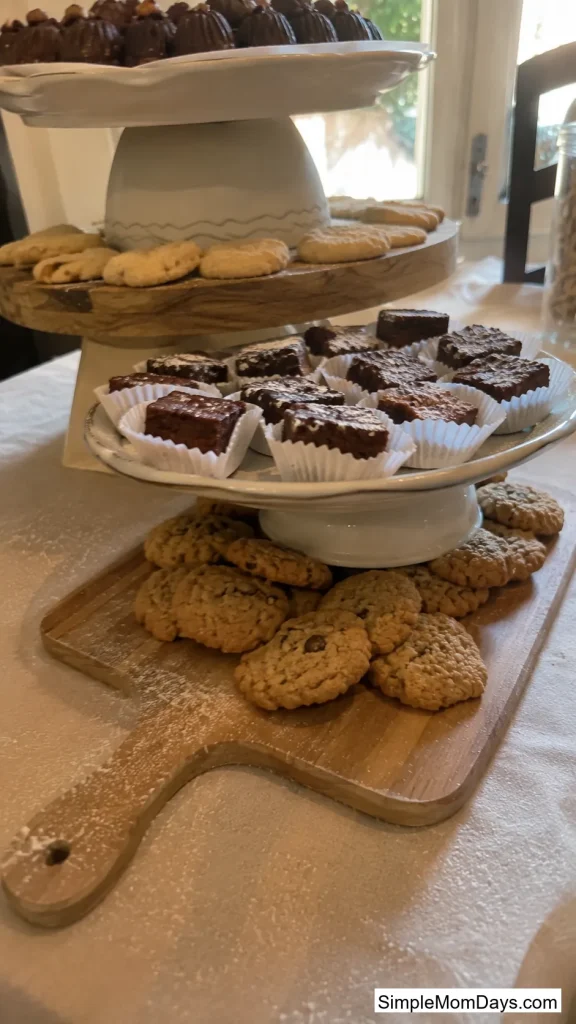
6. Tiered Trays with a Height Trick
Instead of buying a matching tiered stand, stack a few cake plates and cutting boards you already own using overturned bowls or short candle holders as risers between layers.
Height is what makes a dessert table look full even when you only have three or four kinds of treats — a flat table with the same amount of food looks sparse by comparison.
Keep the tallest riser toward the back so nothing blocks the view of what’s on the lower tiers.
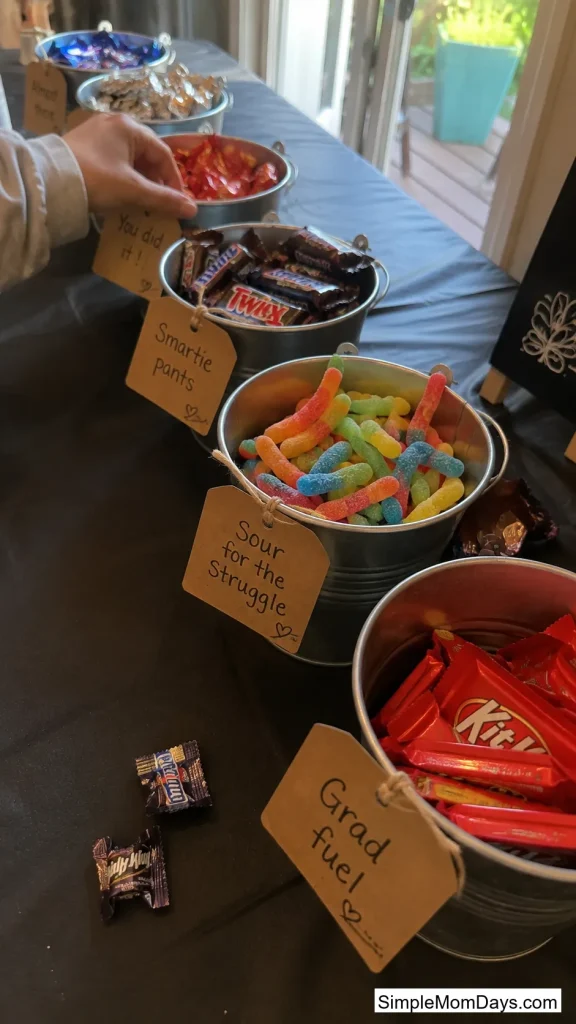
7. Labeled Candy Bar Buckets
Set out a few small buckets or jars of candy, each with a handwritten tag that plays on the grad’s school experience — think “Extra Credit” for gummy bears or “Honor Roll” for chocolate-covered pretzels.
The labels are what make people stop and read instead of just grabbing a handful and moving on. It’s a small detail, but it’s the kind that gets mentioned after the party’s over.
Stick to plain candies rather than anything filled with liqueur so the whole table stays kid-friendly and easy to serve.
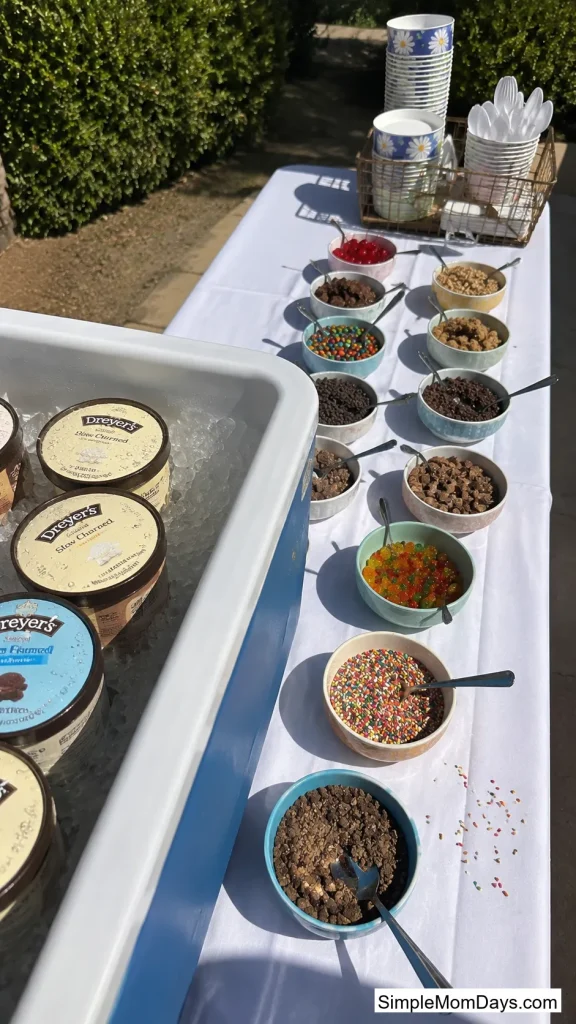
8. A Sundae Station for Warm-Weather Parties
Set out a few tubs of ice cream in coolers with ice, then line up toppings — sprinkles, crushed cookies, caramel, fresh fruit — in small labeled bowls down the table.
It solves the biggest problem with a summer dessert table, which is that frosting and chocolate melt fast in direct sun. Ice cream in a cooler holds up, and it gives guests something to actually do at the table instead of just grabbing and walking away.
Keep napkins and spoons in a caddy at the end so the line doesn’t back up looking for utensils.
Memory Tables That Guests Actually Stop At
A memory table only works if it gives people a reason to slow down, not just a wall of photos to glance past.
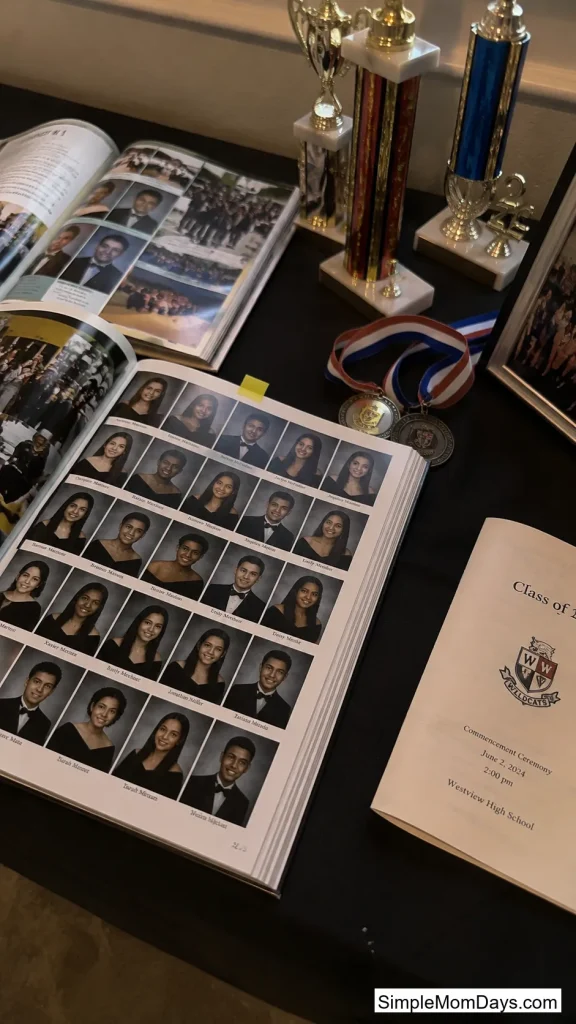
9. The Yearbook and Trophy Spread
Lay out a stack of old yearbooks opened to pages featuring the grad, alongside any trophies, medals, or awards they’ve collected over the years, arranged at slightly different heights.
What makes this work better than a straight photo display is that guests can physically flip through the yearbooks themselves, which turns a passive table into something people linger at for a few extra minutes.
Add small sticky flags on the yearbook pages ahead of time so people don’t have to hunt for the right photo.
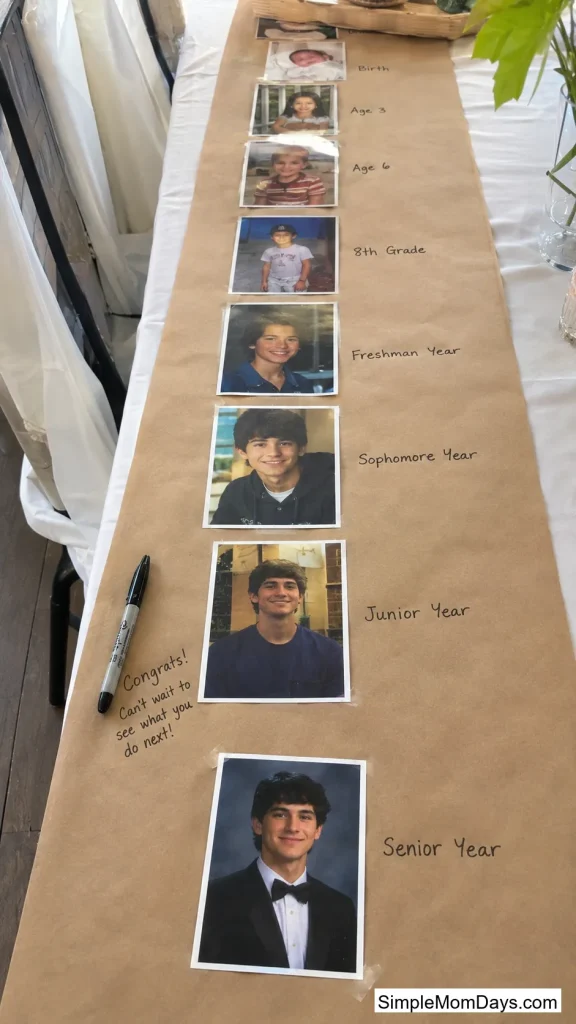
10. A Growth Timeline Runner
Instead of scattering photos across the table, tape a long strip of butcher paper down the center and arrange pictures chronologically from kindergarten to senior year, left to right like a timeline.
The chronological order does something a random photo scatter doesn’t — it tells a story guests can follow start to finish, which is exactly the kind of thing that gets people saying “oh my gosh, look how little he was here.”
Leave gaps between school years for guests to jot a quick memory directly on the paper.
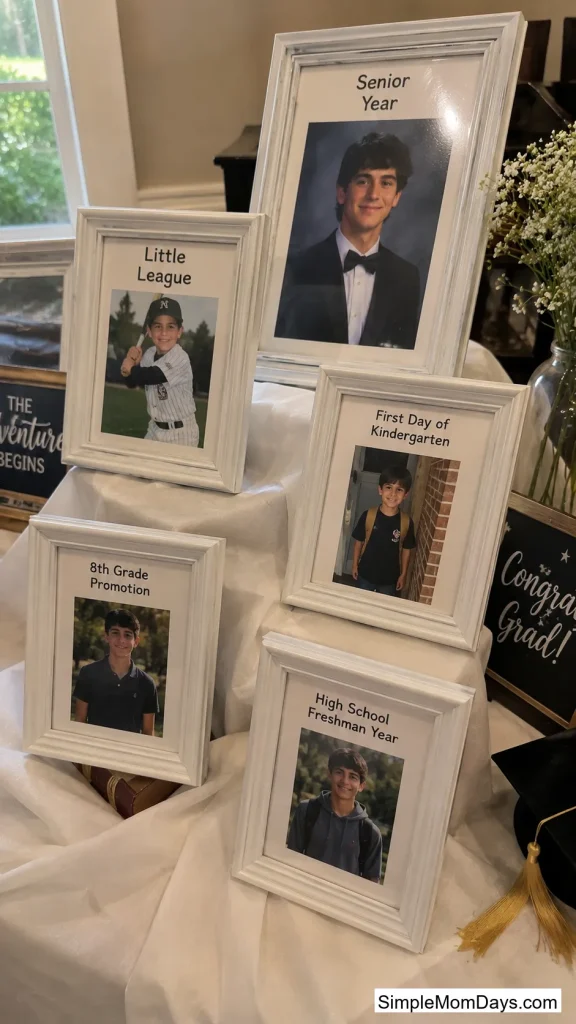
11. Framed Milestone Photos on Risers
Pick five or six photos that mark real milestones — first day of kindergarten, a championship game, prom, the senior portrait — and frame them in mismatched thrifted frames set at different heights using books or boxes underneath the tablecloth.
Fewer, larger framed photos read as more intentional than a table crowded with dozens of small snapshots, and the varied height keeps the display from looking flat.
Spray paint the mismatched frames one uniform color first so they read as a set even though they came from different places.
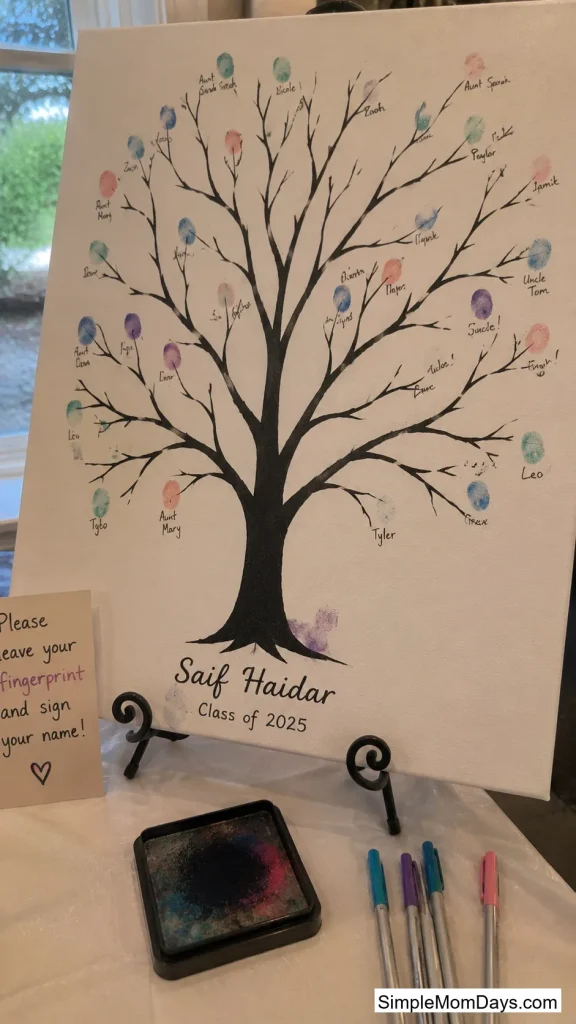
12. A Fingerprint Tree Guest Activity
Set out a printed or painted bare tree outline on canvas or poster board, along with an ink pad and a few thin markers, and ask guests to press a fingerprint “leaf” onto the tree and sign their name next to it.
It’s a memory table piece that keeps building throughout the party instead of sitting there finished from the start, which means late arrivals still get to add something.
Frame the finished canvas afterward — it holds up far better long-term than a page in a guest book that eventually gets tucked in a drawer.
Card, Gift, and Guestbook Tables
These tables get less attention in most planning guides, but they’re where the keepsakes actually come from.
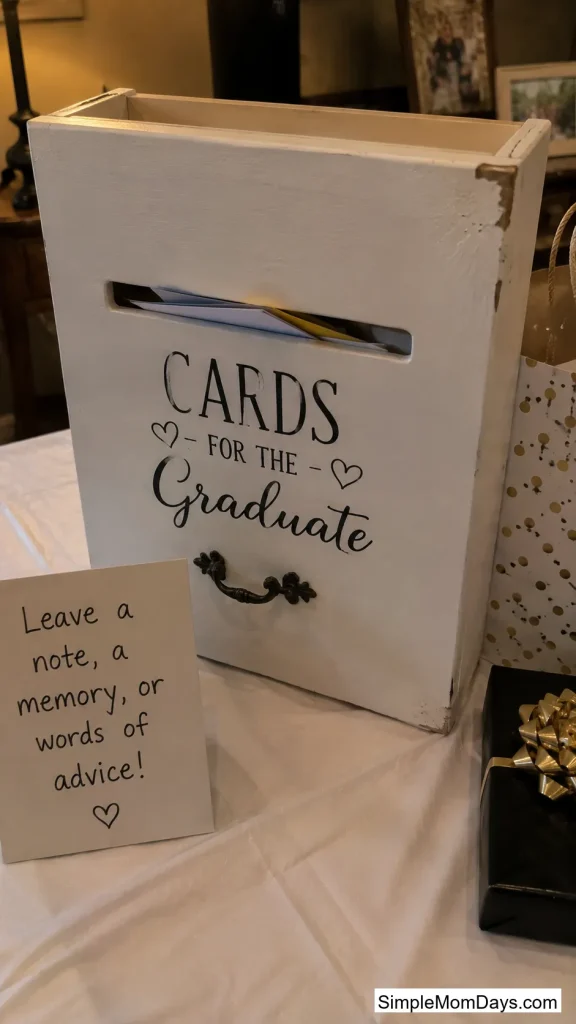
13. A Repurposed Drawer Card Box
Pull an old drawer out of a dresser you’re not using, paint it, and stand it upright with a slot cut in the front for cards. Set it on the gift table with a small sign pointing guests to it.
It solves a problem that a plain cardboard box never does — an open drawer looks like an actual piece of furniture at the party rather than a container someone grabbed at the last minute, and it can go straight into the grad’s dorm room afterward.
Line the inside with fabric scraps so cards don’t slide around every time someone opens the drawer.
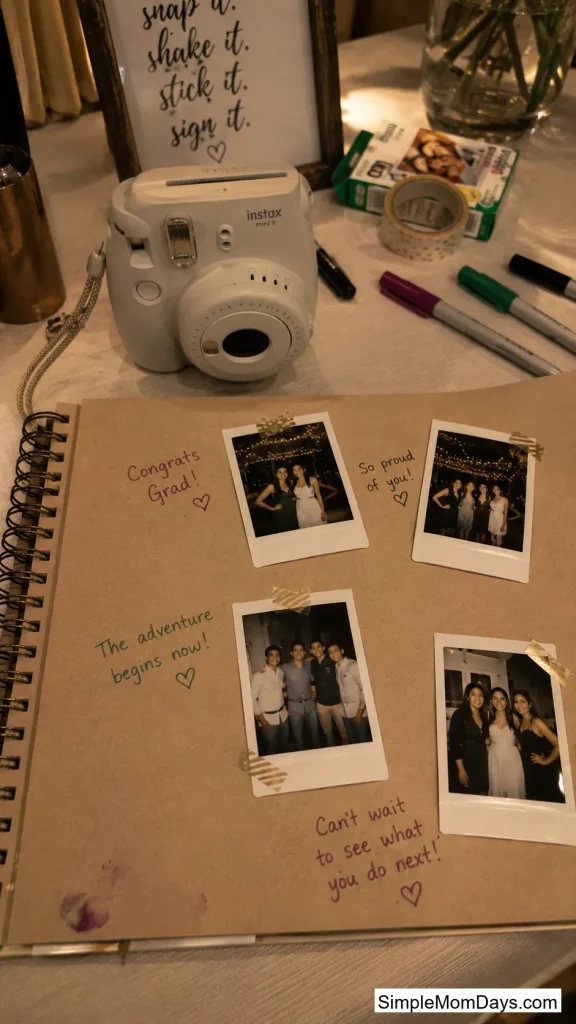
14. An Instant-Camera Guest Book Station
Set an instant camera on the table along with a blank scrapbook, tape, and markers, with a small sign asking guests to snap a photo of themselves, stick it in the book, and leave a note next to it.
This beats a plain sign-in book because it captures who was actually there in a way names alone never do — years later, the grad gets faces along with the messages, not just handwriting.
Pre-fill the first few pages yourself before the party starts so guests can see exactly how it’s supposed to work.
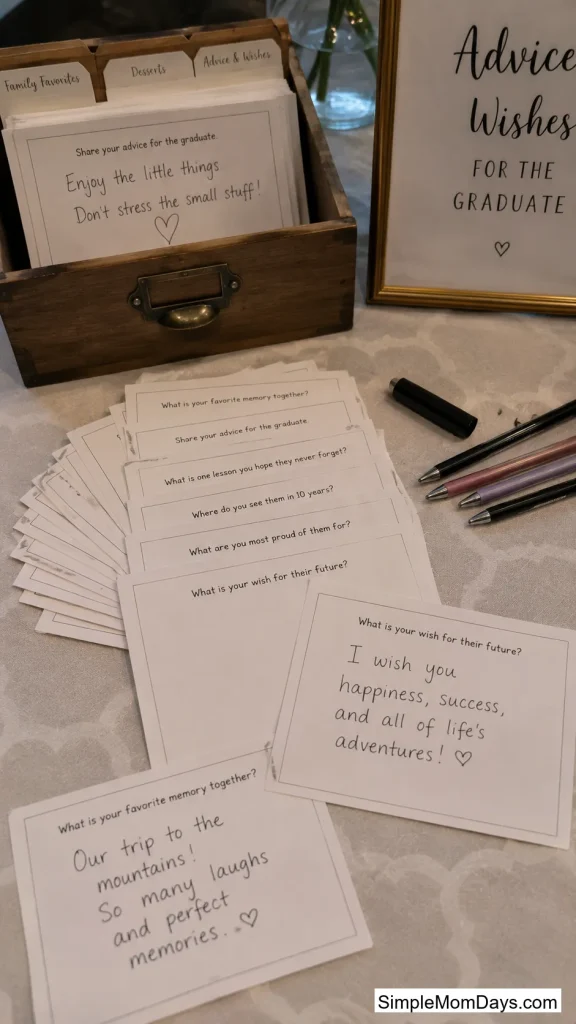
15. A Prompt-Card Advice Table
Instead of a blank guest book, set out small cards each printed with a different prompt — “best advice for freshman year,” “a memory with the grad,” “where I think you’ll be in ten years” — and let guests pick one to fill out.
Prompts get better answers than a blank page does. Most people freeze up in front of an empty guest book; a specific question gives them somewhere to start.
Sort the finished cards into a small recipe box afterward so the grad can flip through them by category whenever they want a boost.
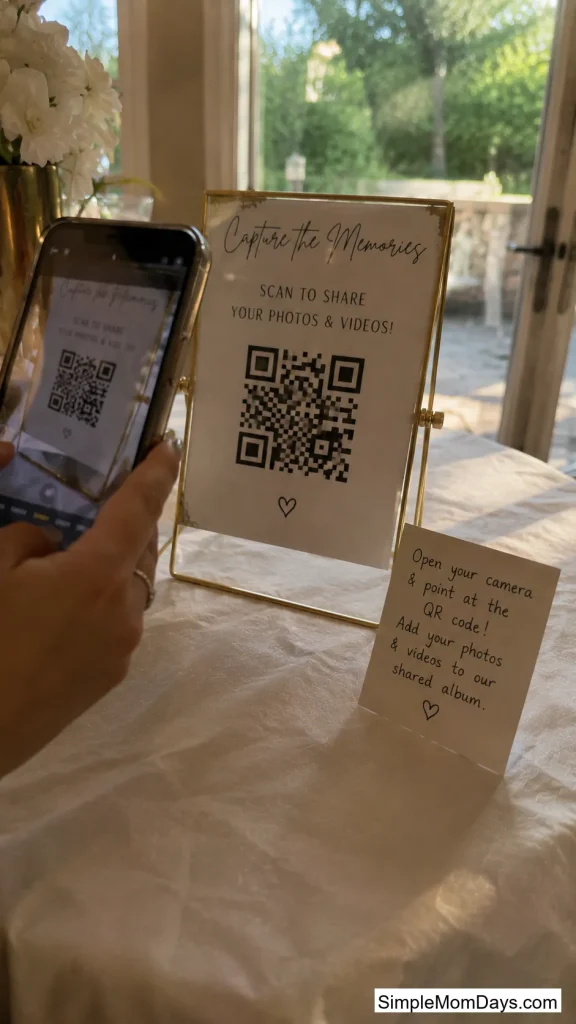
16. A QR Code Memory Wall
Print a QR code linking to a shared photo album and set it on a small stand on the table, next to a sign explaining that guests can scan it to drop in their own photos from the party.
It catches all the candid shots a physical guest book never will — the group photo someone took on their phone, the picture from across the yard nobody thought to print out.
Check the album link works from a phone camera before the party starts; a broken code just sits there unused all day.
Backdrop and Photo-Ready Tables
A little height behind the table does more for photos than anything on top of it.
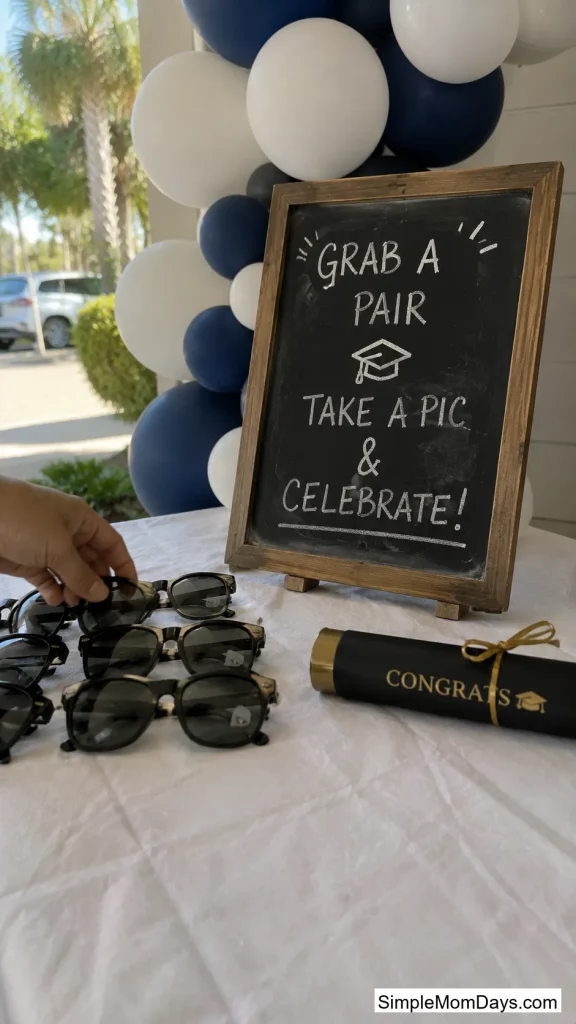
17. A Balloon-Framed Selfie Table
Set a small table with a few props — sunglasses, a real diploma tube, a chalkboard sign with the grad’s name — against a simple balloon garland in two or three colors instead of a full arch.
A garland behind a small table takes up far less space than a full balloon arch and still gives people a clear photo spot without crowding the yard.
Keep the balloon colors to two or three total — more than that starts to look busy in photos.
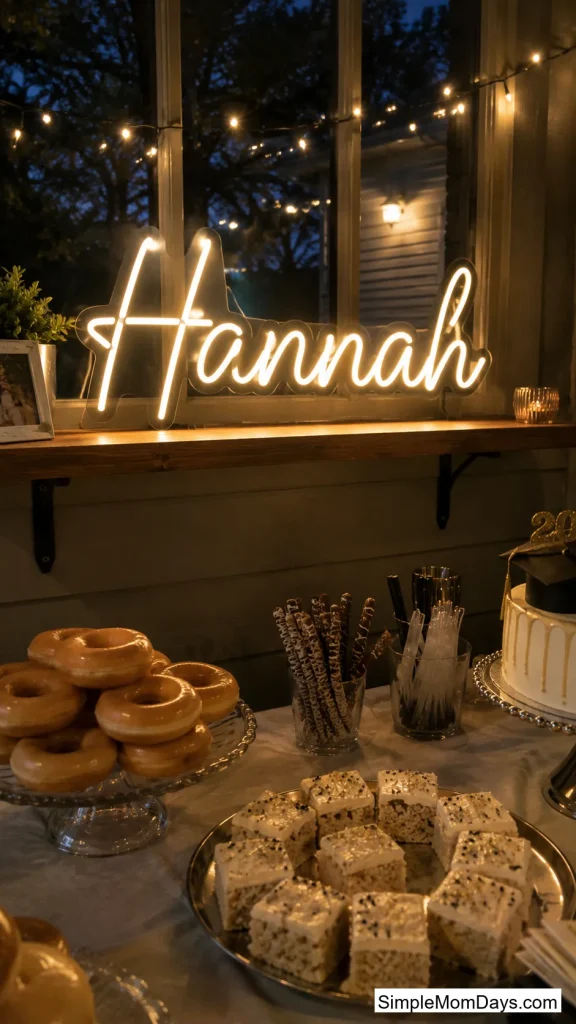
18. A Neon Sign Anchor Table
Place a battery-powered neon-style sign — the grad’s name, “Class of 2026,” or a short phrase — on a small table or shelf behind the dessert or gift table to anchor that whole corner of the party.
It gives evening parties a focal point that doesn’t depend on natural light, which matters if your celebration runs past sunset and the rest of your decorations lose their color in the dark.
Battery versions avoid running extension cords across a yard where people are walking.
Budget and Last-Minute Table Ideas
If the party snuck up on you, these three take under thirty minutes each and still look intentional.
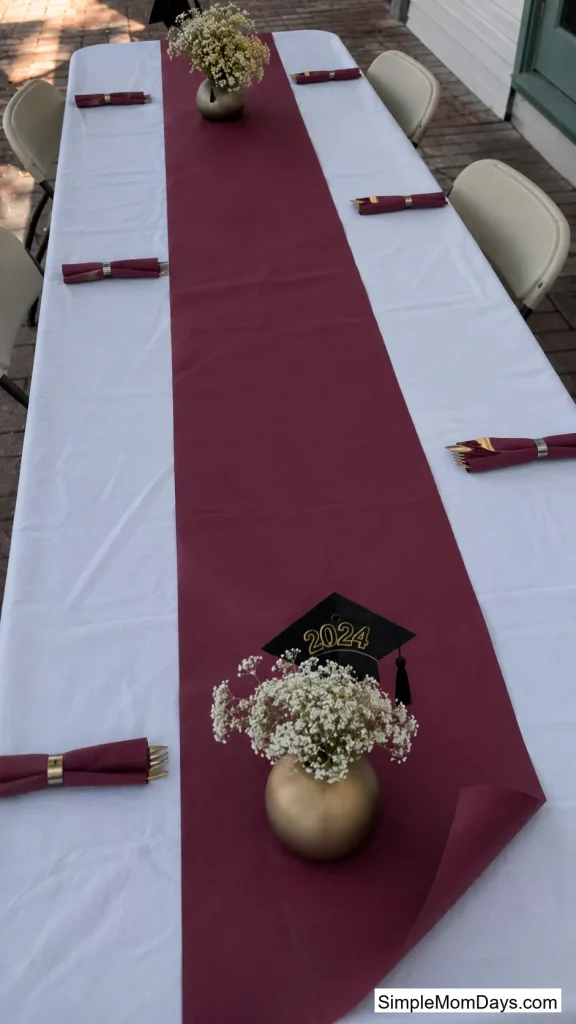
19. The One-Roll Table Runner Trick
Buy a single roll of craft paper in the grad’s school color and run it down the center of a plain tablecloth instead of buying a matching runner.
One roll covers several tables, which a set of purchased runners rarely does for the same price, and the paper can be written on directly for a personal touch if you want guests to leave notes right on the table.
Weight the ends down with a small centerpiece so it doesn’t shift every time someone bumps the table.
20. Confetti as the Only Decoration
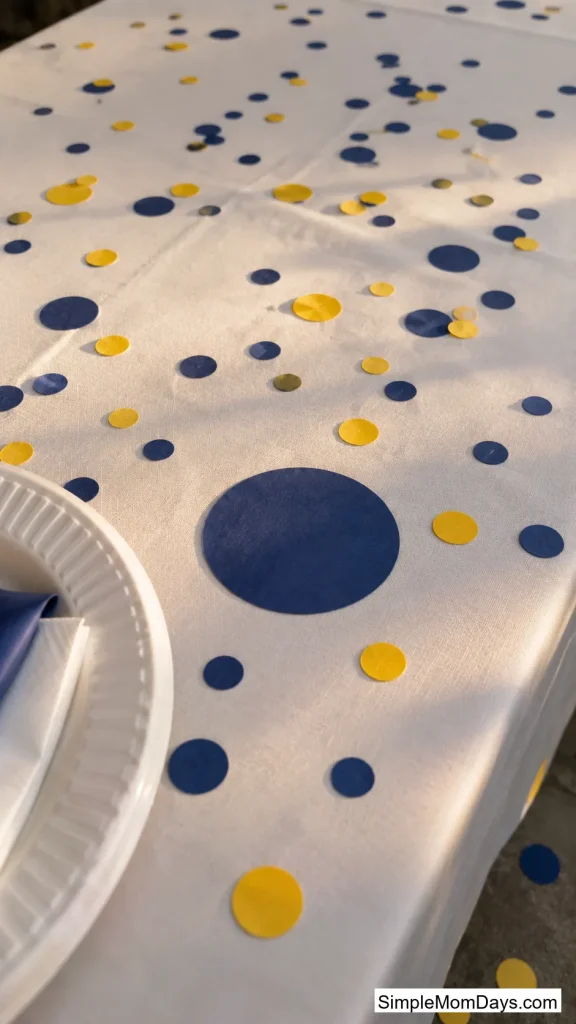
Scatter oversized paper confetti in school colors directly across a plain tablecloth — no vases, no centerpieces, nothing else needed.
It’s the fastest table on this list to pull off, and it still reads as decorated because the confetti does the color work that a centerpiece usually handles.
Buy the jumbo-cut confetti rather than the tiny craft kind — bigger pieces show up in photos and don’t scatter into the grass as easily.
21. A Borrowed-Vase Flower Mix
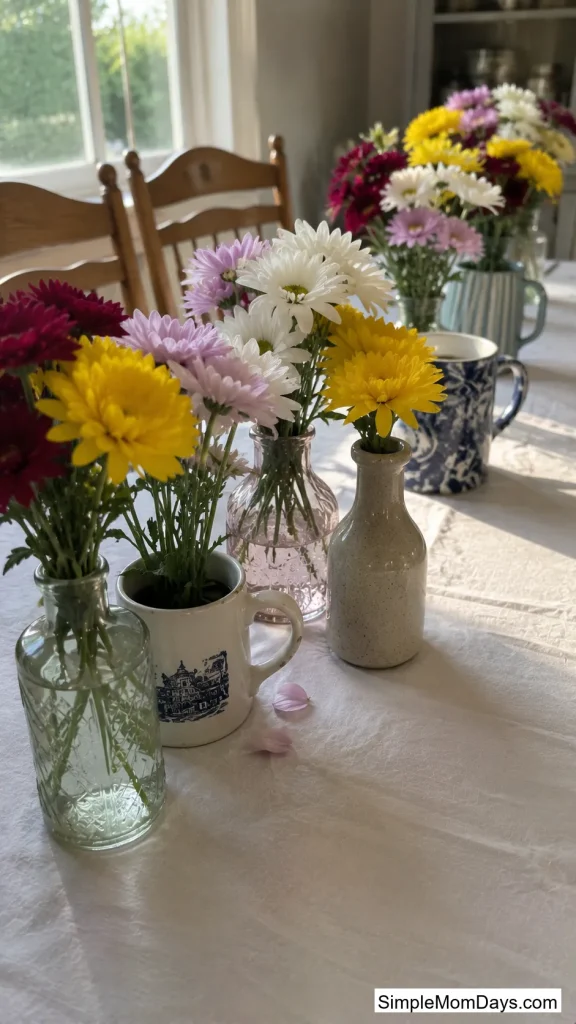
Pull whatever vases, mugs, or jars you already own around the house, fill them with a few grocery-store flower bunches split between containers, and cluster them down the center of the table.
Mismatched containers with the same flowers running through all of them look pulled-together instead of thrown together, and it costs the price of two or three flower bunches instead of a full florist order.
Trim the stems shorter than you think you need — short, clustered arrangements read as styled; tall single stems in small vases tend to tip over.
Twenty-one is a lot of tables for one party. Start with whichever ones solve a real problem you already have — a bare gift table, a dessert spread that needs height, a memory table that’s just photos taped to foam board — and build out from there. The tables that get remembered are usually the ones with one specific, thought-out detail, not the ones with the most decorations piled on.