
Halloween crafting at our house means the kitchen table disappears under construction paper scraps for most of October, and half the fun is never knowing what a five-year-old will call “finished.”
This list covers 25 art projects that go past the usual paper plate and cotton ball routine. Some borrow ideas from real artists, some use nothing but recycling bin scraps, and a few are built for kids old enough to want something a little more advanced.
Everything below is grouped by type, so scan for whatever fits your afternoon — a quick painting session, a rainy-day recycling build, or a project sturdy enough for a teenager who thinks they’re too old for crafts.
Famous-Artist-Inspired Projects
Borrowing a real artist’s technique turns a Halloween craft into a mini art history lesson without anyone noticing it’s educational. These five ideas take recognizable styles and give them a seasonal twist.
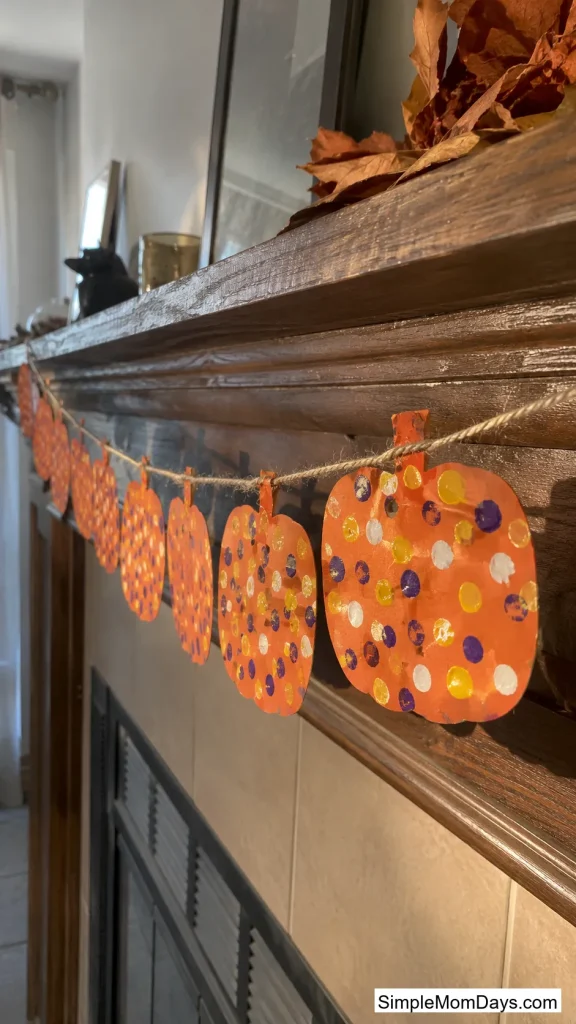
1. Kusama-Style Dot Pumpkins
Cut a few simple pumpkin shapes from orange cardstock and hand over a fistful of cotton swabs dipped in paint. That’s the whole setup — no drawing involved, just dots in every color available.
Artist Yayoi Kusama built a career covering surfaces in dots, and pumpkins are one of her most recognizable subjects. Kids who tense up at “draw a face” often loosen up the second the assignment becomes “add more dots.” There’s no way to mess it up, which makes this one of the few crafts that works equally well for a shy 4-year-old and a confident 10-year-old.
Skip the paintbrush — a cotton swab or pencil eraser gives a cleaner dot. String the finished pumpkins on twine for an instant garland.
2. Warhol-Style Pop Art Ghost Grid
Trace the same ghost outline four or six times onto a sheet of paper, then color each one in a completely different combination — a purple ghost with green eyes, an orange ghost with black eyes, and so on.
Andy Warhol made repetition famous by painting the same image in different color palettes side by side. Kids get the visual payoff of a finished grid without needing to draw six different ghosts, and the exercise doubles as a quick color lesson — swap just the background or just the outline color and see how different the same shape can look.
Mount the finished grid on black paper for contrast. This works well as a group project too, with each kid taking one square of a shared poster board.

3. Picasso-Style Cubist Jack-o’-Lantern Portrait
Instead of a symmetrical jack-o’-lantern face, have kids draw one eye where a nose might go, split the mouth in half, or stack two triangle eyes on top of each other.
This is a loose take on Cubism, the movement Pablo Picasso helped pioneer, where a subject gets broken apart and reassembled from multiple angles at once. Most kids default to a triangle-eyes-triangle-nose pumpkin face without thinking twice, so this project forces a pause — a good exercise in breaking a pattern on purpose instead of by accident.
Markers work better than paint here since the lines need to stay crisp. Older kids can go further and cut the face into pieces, then glue them back at odd angles.

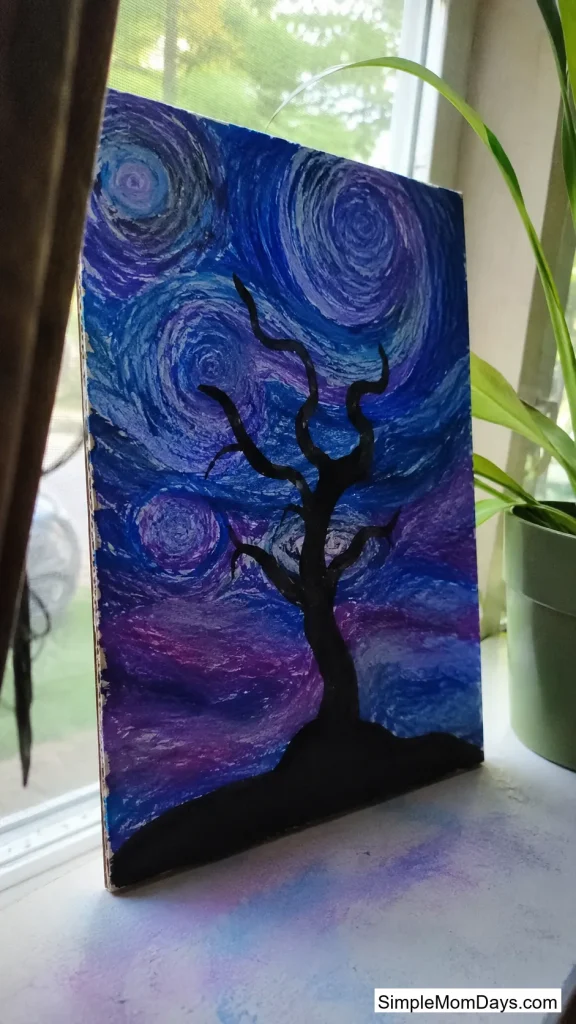
4. Van Gogh-Inspired “Scary Night” Sky
Cover a sheet of paper in swirling blues, purples, and blacks using thick strokes — the same kind of movement Vincent van Gogh used in Starry Night — then glue on a black silhouette of a crooked tree or haunted house along the bottom edge.
The swirling technique is forgiving because messy, overlapping strokes actually make the piece look more intentional, not less. It’s a good project for kids who get frustrated with precision, since the whole point is loose, energetic brushwork rather than clean lines.
Oil pastels blended with a finger work better than paint for the swirl effect, though a stiff-bristled brush gets close. Add a yellow moon last so it stands out against the dark background.
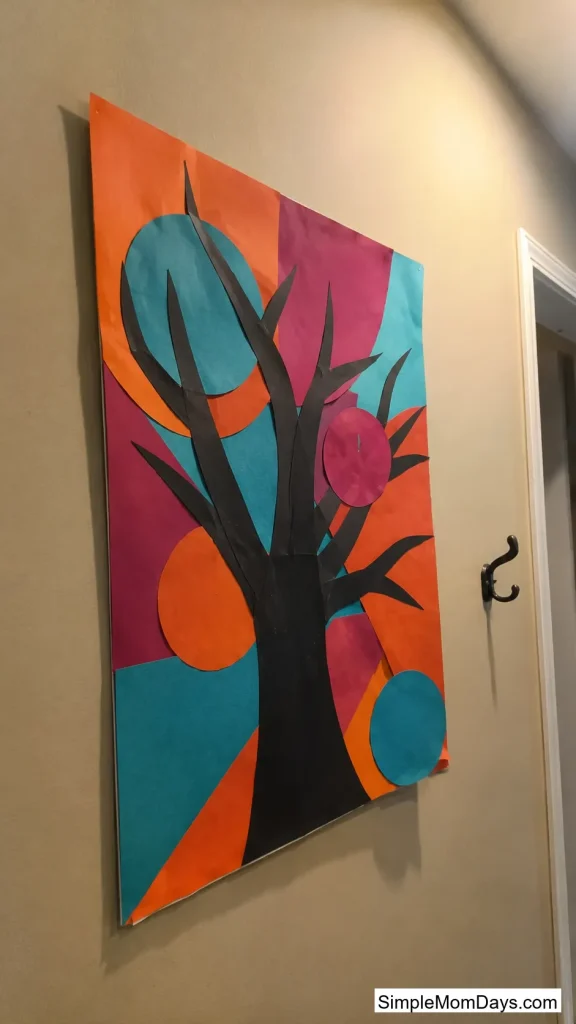
5. Kandinsky-Style Spooky Tree
Cut a bare, crooked tree silhouette from black paper, then fill the background around it with bold geometric shapes — circles, triangles, wavy lines — in clashing colors instead of a realistic sky.
Wassily Kandinsky believed shapes and colors could carry emotion on their own, without needing to look like anything specific. Applied to a Halloween tree, that means kids get permission to make the background as strange as they want, since abstract art doesn’t have a wrong answer the way a realistic drawing might.
This works well as a two-step project: draw and cut the tree silhouette one day, then fill in the background the next, so the paint or oil pastel has time to fully dry without little hands smudging it.
Painting & Light Effects
Halloween’s color palette — deep purple, burnt orange, near-black — makes it an easy season to teach kids how light and color actually behave on paper.
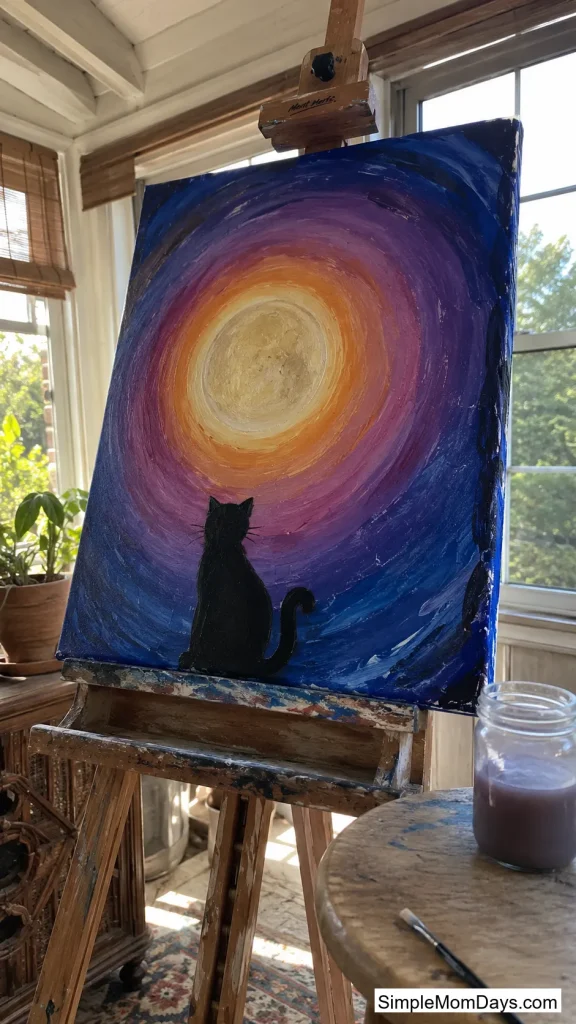
6. Radial Glow Harvest Moon Painting
Paint a bright yellow full moon in one corner of the paper, then paint rings of orange, then purple, then dark blue moving outward from it, blending the edges before the paint dries.
This is a simple, hands-on way to show kids how light fades the farther it gets from its source — the same idea behind a sunset or a streetlight glow, just in a Halloween color scheme. Once the paint dries completely, glue on a black paper silhouette of a cat, bat, or crooked tree so it reads as a night scene instead of an abstract color study.
Tempera paint blends best here since it stays workable longer than acrylic. Give it a full hour to dry flat before adding the silhouette on top.
7. Wax-Resist Watercolor Ghost
Draw a ghost shape directly onto white paper using a white crayon — it’ll be almost invisible while drawing — then paint over the entire page with dark watercolor. The ghost appears out of nowhere as the paint refuses to stick to the waxy lines.
The reveal is the whole appeal here. Kids who’ve done this once usually ask to do it again immediately, and it’s a genuinely useful way to show that different materials interact differently on the same surface, without needing to explain any of it out loud.
Purple or navy watercolor gives the most dramatic contrast against the hidden white ghost. Add a few stars with the white crayon before painting for extra detail that reveals itself the same way.

8. Drip-Painting Bat Silhouettes
Tape a bat-shaped stencil onto a large sheet of paper, then let kids flick, drip, and splatter black, purple, and dark red paint across the page — brush included, but fingers and an old toothbrush work even better for the splatter effect.
This borrows from action painting, the mid-century movement built around flinging and dripping paint instead of applying it with careful strokes. Once the paint dries, pull off the stencil to reveal a clean bat shape surrounded by chaotic splatter, which reads as a night sky full of motion.
Lay down newspaper or a plastic tablecloth first — this is genuinely messy, and that’s the entire point.

Sensory & Texture Crafts
Not every kid wants to sit still with a paintbrush, and not every project needs precision. These three lean on texture and touch instead of fine motor control.
9. Scratch-Art Jack-o’-Lanterns
Cover a piece of cardstock edge to edge with bright oil pastel — orange, yellow, green, whatever’s on hand — pressing hard so the color goes down thick. Then cover the entire thing with a layer of black crayon or black tempera mixed with a little dish soap.
Once the black layer dries, hand over a toothpick or the wrong end of a paintbrush and let kids scratch a jack-o’-lantern face into the black surface. The bright color underneath shows through wherever the black gets scratched away, which feels a little like uncovering a hidden picture.
This one holds attention longer than most painting projects because the scratching itself is satisfying, not just the finished piece. It also suits kids who get frustrated with regular drawing, since every scratch just becomes part of the texture instead of a mistake to fix.

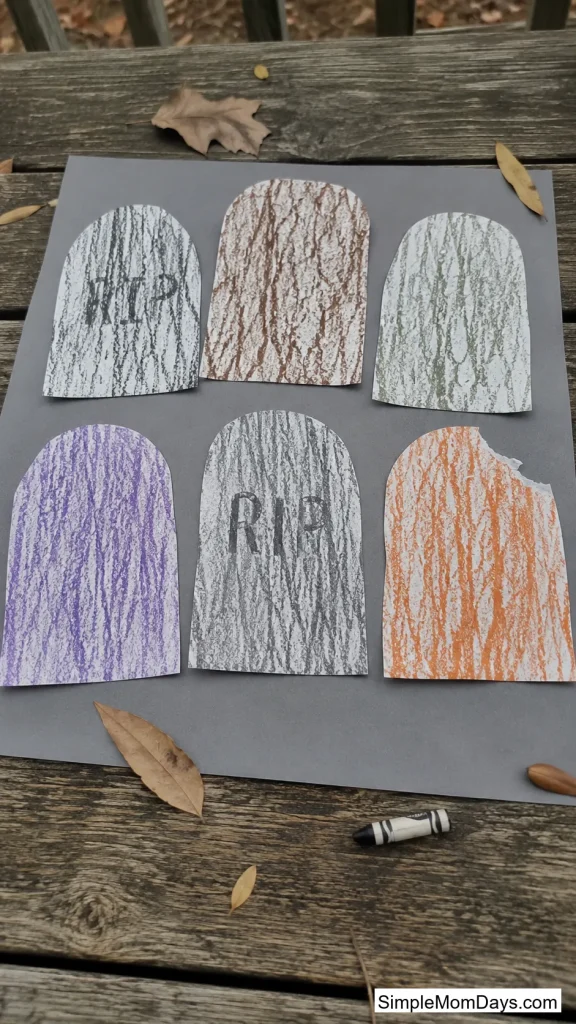
10. Gravestone Bark-Rubbing Collage
Peel the paper off a few dark crayons, then head outside and rub the crayon sideways over tree bark, a brick wall, or a piece of window screen, holding paper against each surface to pick up the texture.
Cut the rubbings into rectangle and arch shapes once you’re back inside, and arrange them like a row of gravestones in a graveyard scene. Every rubbing comes out slightly different depending on the surface it came from, so the finished collage has real texture variety instead of the flat look most Halloween scenes end up with.
This is a good outdoor-then-indoor project for a day when kids need a break from screens and a reason to walk around the yard. Bark, brick, and mesh give the most visible texture — smooth surfaces like glass won’t pick up much.
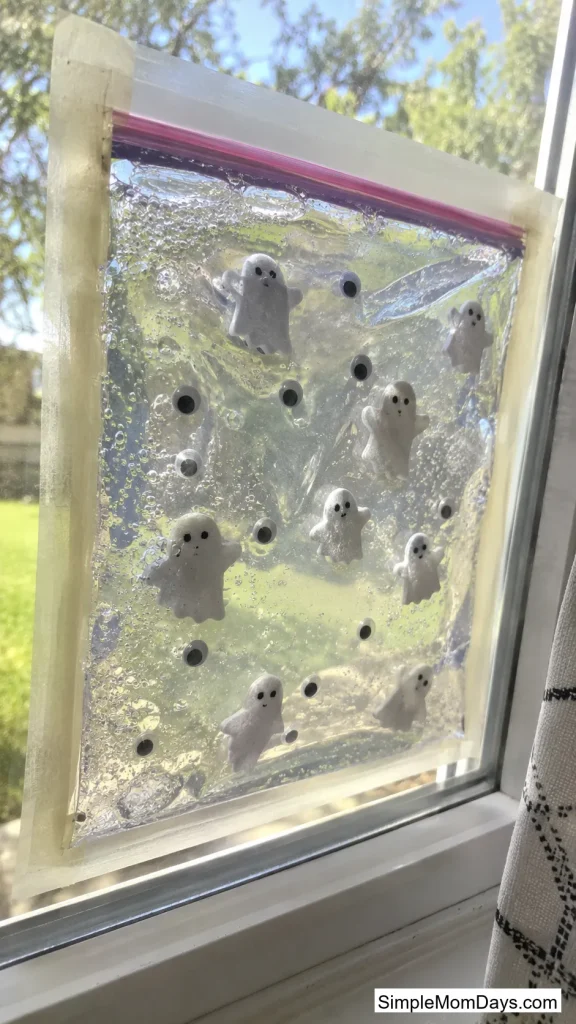
11. Squish-Bag Ghost Sensory Art
Squeeze clear hair gel into a quart-size zip-top bag, drop in a few small foam ghost or bat shapes plus a couple of googly eyes, then seal the bag and tape the edges shut with packing tape so nothing leaks.
Kids push the shapes around inside the sealed bag with their fingers, arranging a whole Halloween scene without a drop of actual mess. It’s less an art project in the traditional sense and more a sensory activity that happens to result in a display-worthy piece once taped to a window, where the light shows through the gel.
Worth keeping in the rotation for kids who are sensitive to messy textures on their hands directly, since the bag creates a barrier between the material and their skin while still giving them the same squishing sensation.
Recycled & Eco-Friendly Builds
A recycling bin has most of what these four projects need already sitting in it. They take a little longer than a single sitting but turn into the kind of thing that survives past November 1st.
12. Milk Carton Haunted Mansion
Rinse out an empty milk or juice carton and let it dry completely, then cut a slanted roofline into the top so it reads as a house shape instead of a box. Paint the whole thing gray or black and let it dry before adding any details.
This is closer to a small building project than a typical craft — kids cut window shapes, add a popsicle-stick porch railing, and figure out where the door goes, which means actual measuring and planning instead of just decorating a flat surface. A few crooked windows and a lopsided roof only add to the haunted-house effect, so there’s no pressure to get the angles perfect.
Let the base coat of paint dry fully before adding windows or a roof, or the second layer will drag and smear the first.

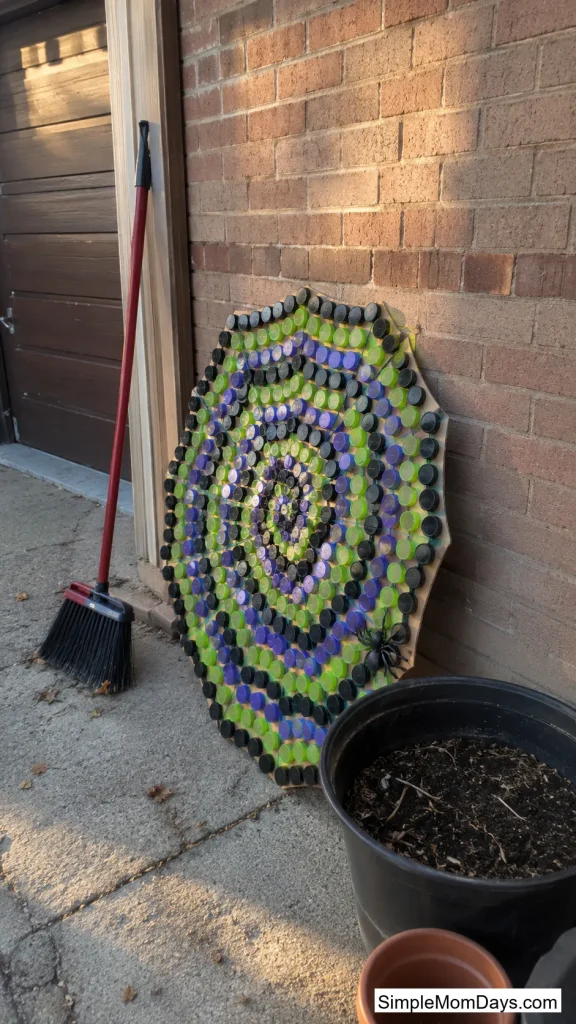
13. Bottle Cap Mosaic Spiderweb
Save up plastic bottle caps for a week or two — the collecting is half the activity for younger kids — then arrange them in a spiral pattern on a piece of cardboard to form a spiderweb, gluing each one down as you go.
Sort caps by color first so the web has some kind of visual logic instead of total randomness, whether that means alternating two colors around the spiral or grading from dark in the center to light at the edges. A plastic spider glued at one edge finishes it off.
This is a genuinely good use for caps that would otherwise get tossed, and the mosaic style makes for a sturdier piece than paper crafts that tend to bend or tear within a season.
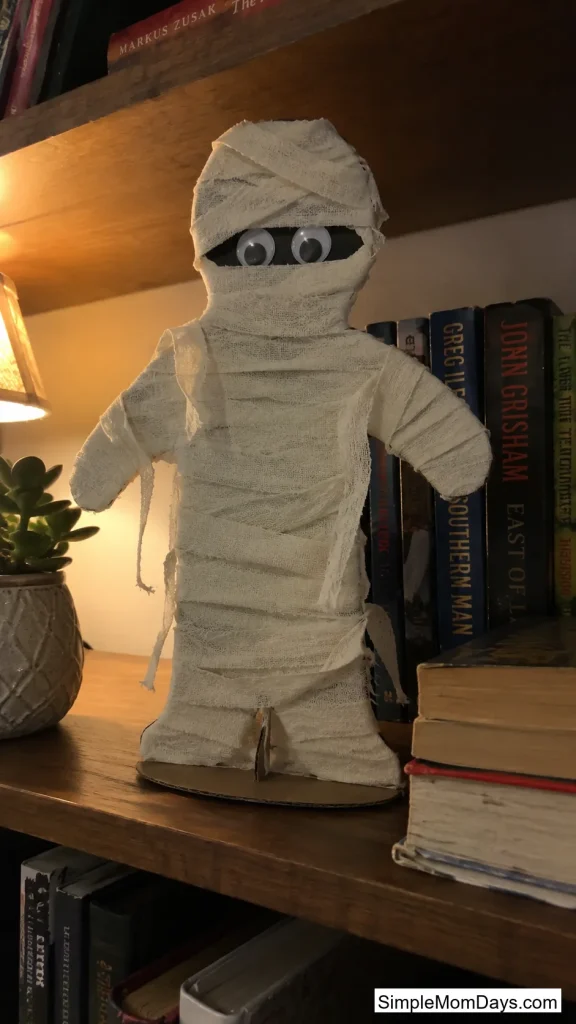
14. Cereal Box Mummy Standee
Cut a rough body shape out of an empty cereal box — arms slightly out from the body, legs together — then fold a small tab at the bottom so it can stand upright on its own.
Tear strips of white fabric scraps or paper towel and wrap them around the cardboard body in overlapping layers, leaving gaps here and there the way a mummy’s wrappings never quite line up cleanly. Glue on a couple of googly eyes peeking out from between the strips once the wrapping is done.
Because the cereal box gives it a stiff backbone, this one actually stands on a shelf or table instead of lying flat, which makes it feel more like a finished decoration than most paper-based Halloween crafts.
15. Egg Carton Spider Colony
Cut individual cups out of a cardboard egg carton and paint each one black or deep purple. Once dry, poke four small holes on each side and thread pipe cleaners through to form eight bent legs, then glue on two googly eyes.
Making four or five of these instead of just one turns it into a small collection rather than a single craft, which is an easy way to stretch a rainy afternoon a bit longer. Group the finished spiders on black paper with glue-and-salt webbing strung between them for a display that looks more built-out than a single spider ever would.
Egg carton cardboard holds paint well without warping, unlike thinner construction paper spiders that tend to curl once they dry.

Drawing & Illustration Challenges
These four are lower on mess and higher on actual drawing practice, which makes them a good fit for kids who’d rather sketch than glue.
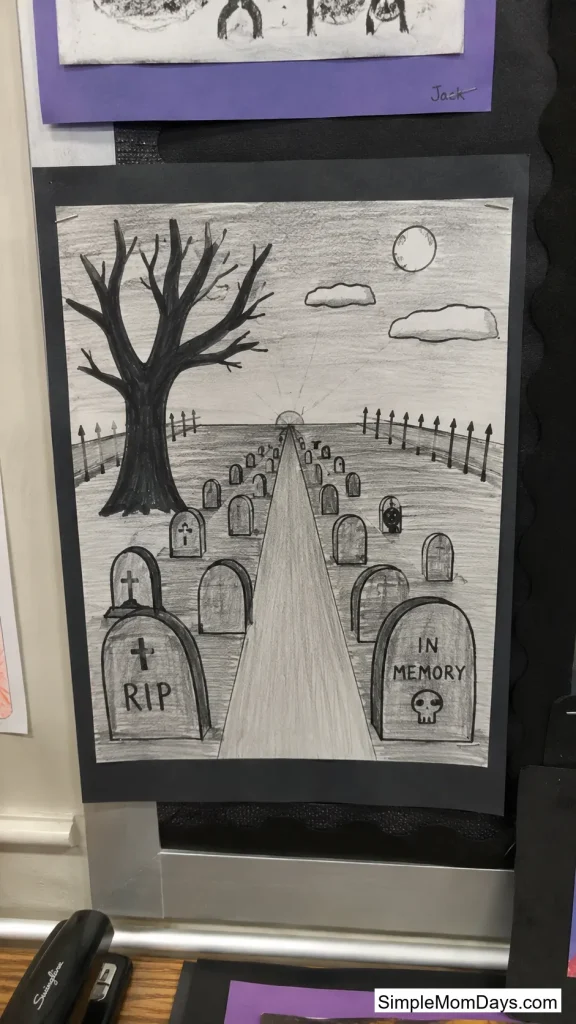
16. One-Point Perspective Graveyard Drawing
Draw a horizontal line across the middle of the paper, then mark a single point somewhere on that line — this is the vanishing point everything else will connect to. Draw a row of headstone shapes below the line, making the ones near the bottom large and the ones closer to the horizon progressively smaller.
Connect the corners of each headstone back to the vanishing point with straight lines, and the shapes suddenly read as headstones fading into the distance instead of a flat row side by side. This is real one-point perspective, the same technique used to draw a hallway or a road disappearing into the distance, just applied to a graveyard.
Add pencil shading to the side of each headstone facing away from a light source, then finish with silhouettes of bats or a crooked tree along the horizon.
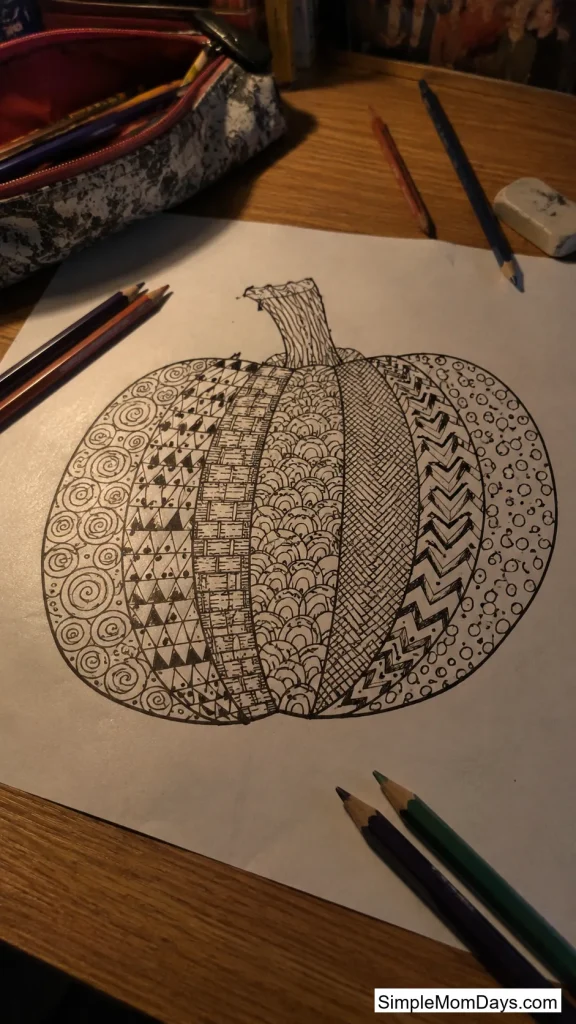
17. Zentangle Pumpkin Patterns
Draw a simple pumpkin outline and divide the inside into five or six sections using curved lines, the way an orange naturally divides into segments. Fill each section with a different repeating pattern — dots, spirals, cross-hatching, small triangles — using just a black pen.
This is a version of Zentangle, a drawing method built entirely around small repetitive patterns instead of realistic images, and it’s oddly calming for kids who tend to rush through art projects. There’s no drawing skill required beyond straight lines, dots, and curves, which makes it accessible for a kid who insists they “can’t draw.”
A fine-tip marker works better than a thick one here, since the patterns rely on detail that gets lost with a wide tip.
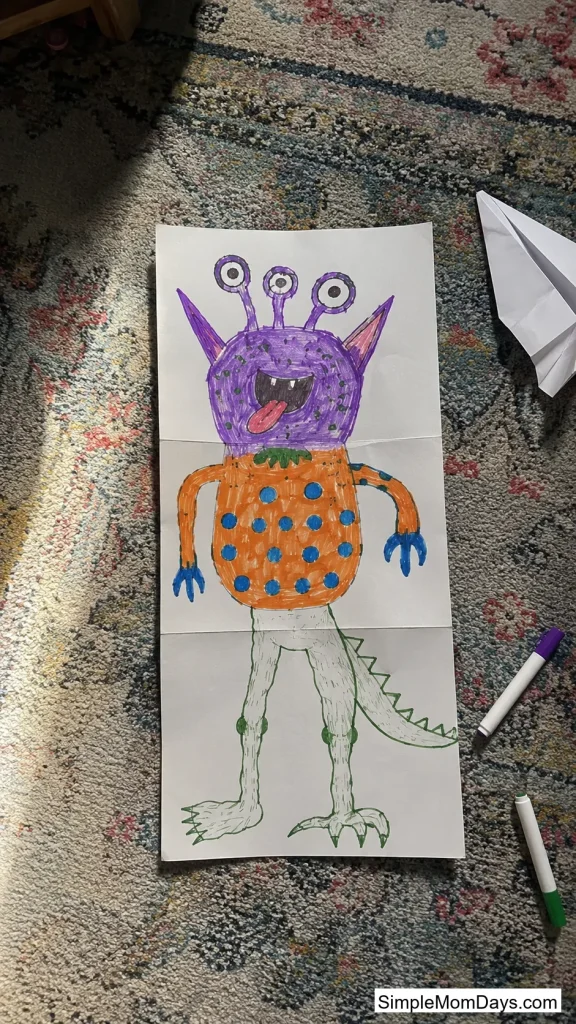
18. Collaborative Creature Drawing Game
Fold a piece of paper into three sections. The first kid draws a head and neck in the top section, then folds the paper so only two small guide lines poke into the next section before passing it along. The next kid draws a torso and arms using just those guide lines, folds again, and passes it to a third kid to draw the legs.
Unfolding the paper at the end reveals one mismatched, often hilarious creature made of three parts nobody could see while drawing. This works particularly well for a group with different drawing confidence levels, since nobody has to be responsible for the whole creature — just one piece of it.
A good five-minute filler between bigger projects at a party, since it needs nothing but paper and a pencil and gets funnier with more rounds.
19. Graphic-Novel-Style Costume Self-Portrait
Have kids sketch themselves wearing a Halloween costume, real or imagined, then go over every line with a black marker for bold, comic-book-style outlines. Fill in the costume and background with a small set of colors — three or four, not the whole box — to keep the look graphic instead of realistic.
Working from a mirror or a printed photo of themselves gives kids something concrete to reference, which tends to produce a stronger drawing than working from memory alone. The costume can be entirely made up, which takes the pressure off getting a real outfit exactly right.
These make a strong hallway display when hung together, since the bold outlines read clearly even from a distance, unlike lighter pencil sketches that tend to disappear on a wall.

Advanced Projects for Tweens & Teens
Kids who’ve aged out of paper plates and pipe cleaners still want to make something for Halloween — it just needs to look like it took actual skill. These four ask for more patience and a steadier hand.
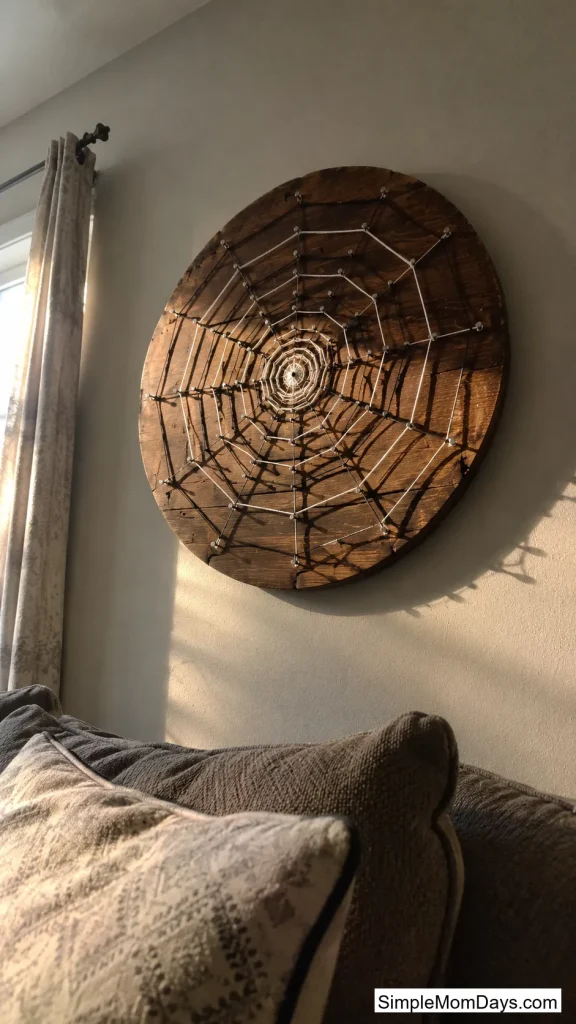
20. Nail-and-String Spiderweb Art
Hammer small nails into a wood board or thick piece of cork in a spiral pattern, spacing them evenly from the center outward — this part needs an adult’s help or at least close supervision.
Once the nails are in place, wrap black or white embroidery thread around them, working outward from the center and crossing back and forth to build up the web pattern. The string does all the visual work here, and a few uneven strands only make the web look more realistic, since real spiderwebs aren’t perfectly symmetrical either.
This takes longer than most crafts on this list — closer to 45 minutes once the nails are in — which makes it a good fit for a teenager who wants a project with actual detail instead of something finished in ten minutes.
21. Painted Sugar Skull Planter
Paint a small terra cotta pot white as a base coat, then add a skull face using black paint — hollow eyes, a triangle nose, a row of teeth — before filling the space around the face with flowers, swirls, and dots in bright colors.
This borrows the visual style of sugar skull art, which leans on bold color and elaborate pattern instead of anything scary, so the finished piece reads as decorative rather than eerie. Acrylic paint pens give cleaner lines than a brush for the fine floral details, though a thin brush works with practice.
Once sealed with a coat of clear varnish, the pot holds up fine outdoors, which means it can go straight onto a porch step as actual Halloween decor instead of getting boxed up after one photo.

22. Resin Charm Necklace
Pour clear casting resin into small silicone molds shaped like bats, pumpkins, or ghosts, then drop in a pinch of fine glitter or a tiny plastic charm before the resin sets. Once fully cured, the mold pops out a small, glossy pendant that can be strung on a cord.
This one needs real adult supervision, not just a glance from across the room. Resin needs a well-ventilated space, and it’s worth having a teen wear gloves while working with it, since skin contact before curing can cause irritation. Read the specific product’s safety instructions before starting, since cure times and ventilation needs vary by brand.
Done carefully, this produces something that looks close to a store-bought pendant, which is exactly the kind of payoff that makes an older kid want to finish a project instead of abandoning it halfway.

23. Black-Glue Stained Window Art
Draw a bat, spiderweb, or pumpkin outline on paper, then trace directly over every line using black glue — a mix of school glue and black paint, squeezed from a fine-tip bottle — and let it dry completely overnight so it forms a raised, rubbery outline.
Once dry, peel the whole design off the paper and fill in the sections between the black lines with thin washes of watercolor or small squares of colored tissue paper, working like a stained glass window instead of a flat drawing. Taped to a window with actual daylight behind it, the color glows through in a way paint alone never quite manages.
Letting the glue dry fully before peeling is the step most kids want to skip — rushing it tears the design, so this one genuinely needs an overnight wait built into the plan.

Collaborative & Party-Ready Group Projects
These last two need more than one kid to really work, which makes them a good fit for a classroom, a sibling afternoon, or an actual Halloween party.
24. Ghost Story Tessellation Wall
Cut one ghost-shaped template where the top of the ghost interlocks with the bottom of the next one, the way puzzle pieces fit together, then have each kid trace that same template repeatedly across a large poster board so the ghosts tile edge to edge with no gaps.
This uses tessellation, the technique of covering a surface with repeating shapes that interlock without overlapping, most famously explored by artist M.C. Escher. Because everyone traces the exact same template, a group with very different skill levels can contribute to one seamless-looking piece, and the repetition across a full poster board makes for a striking wall display once finished.
Have kids take turns adding one small detail — a name, a date, an expression — to their own ghost once the tracing is done, so the tessellation still has individual personality within the repeated pattern.

25. Classroom Haunted House Door Mural
Cover a classroom or bedroom door with black or dark purple paper as a base, then give each kid one square of paper to turn into a window, a brick, or a small design detail — a bat, a crooked shutter, a jack-o’-lantern glowing on a sill.
Once everyone’s piece is finished, arrange and tape them onto the door together to build one large haunted house scene, with a triangular roof added at the top and a crooked door cut into the base layer underneath. The finished mural covers far more space than any single kid could fill alone, which is what makes group projects like this satisfying in a way solo crafts rarely are.
This works well spread across two sessions — one for individual squares, one for the group assembly — so nobody is standing around waiting for a turn at the door.

Final Thoughts
Twenty-five is a lot of projects, and no house needs to attempt all of them in one October. Pick two or three that match whatever’s already sitting in the craft bin, save the rest for a rainy weekend closer to the 31st, and let the kids pick which ones actually interest them — the projects they choose themselves are always the ones that hold their attention longest.